Normally on my technical blog here, i write on digital tech, specifically web and internet software development. However this week, i had to hack the car which belonged to my mom, who gave it up for use by my teenage son. Unfortunately, we went to the doctor with it, and after the appointment, the car wouldn’t start. Stranded. We walked home, then i later tried to jump start it, to no avail. The car in question is a 2002 Chevrolet Camaro Z28.
Now, when i came back to try and start it, i brought most of the tools i thought i would need to get it started: jumper cables, lithium battery to jump start, wrenches, screwdrivers, etc. Usually i drive Toyotas, i haven’t had a GM vehicle as a daily driver since 1989. The symptoms:
Accessory/On power worked (indicator lights, power windows, radio, etc.)
Turning the key to the start/crank position made no noise at all (only cut power to certain gauges, as normal). There was no starter cranking, there was no clicking of the solenoid
The “security” light on the dash was slow blinking (unfortunately, i didn’t notice this until 24 hours later)
At first, i was operating on the assumption that there was a problem, with the battery, alternator, battery terminals/side posts, or possibly even the starter going bad (maybe try the hit with hammer technique). I replaced the side terminals for $6, but no difference. I also checked as many fuses as possible, and swapped relays, to no effect.
After searching the internet forums, and watching various YouTube videos, i was coming to the conclusion it could be that the security system was flaking out, and the car’s computer was refusing to allow the ignition sequence. Apparently the tell-tale sign was the slow blinking “security” indicator light on the dash. Under normal circumstances, it should illuminate when the key turns to “on”, then turn off a few seconds later.
These GM vehicles notable have an ignition key with a little metal pod in the center. They have to come from the dealer – if you duplicate the key at a regular hardware store, they won’t start the car even if the cylinder turns. That’s due to the VATS security system. The key looks like this:
Apparently, the little piece of metal surrounded in plastic is a resistor of a certain level of ohms. So the car dealership would give you a key blank with the correct Ohms reading to match your vehicle.
I did try to do some sequences to reprogram the alarm system to the key, but they didn’t work (such as turning the key to on for 10 mins, off 5+ secs 3 times).
This video by DanielJaegerFilms explains there are 15 different resistance values. It also explains where to find the orange cable under the dash with a clip to other wires going to your car’s computer. I also watched another video by 810Camaro which had good visuals on where the cables are, and how to wire your own bypass with a resistor. So i decided that was my strategy to get the vehicle home w/o a tow truck.
I did use a multimeter to measure the resistance of my key. It did come close to one of the 15 values in the aforementioned video.
I also removed the kick panel under the drivers side dash to locate the orange cable w/clip, connected to another pair of white/gray wires. I think the orange goes to the interconnect in the steering column, where the other pair to the computer.
I ordered some resistors and alligator clips since there wasn’t anything local. But i just didn’t want to wait a couple days, so a vision literally spoke to me in a dream: use the second ignition key to be the resistor to bypass the security and start the vehicle!
I woke at 5 AM determined to do it. Here’s what i used with materials and tools on-hand:
multimeter (measuring resistance in ohms)
electrical cable (like for speaker wire or similar)
brown paper bags (worked better than cardboard)
vise grip (small is suitable, but i used a larger one)
electrical wire twist connectors (worked better than the binder clips)
wire cutter/stripper
blade and screwdriver punch to make tiny holes in the brown paper insulation
tape (i used gaffer tape)
jumper cables or jumper battery pack, in case your battery is low
The theory of change: use the second key resistor, clamp it to a pair of wires, and wire it up to the unclipped clip to the computer. This should trick the computer into thinking the key is in the ignition with the proper electrical resistance, which will disable the security system, allowing the car to start.
The challenge is to get the pair of wires on both sides of the key, applying enough pressure to keep a decent electrical connection, while not touching the wires to any other part of the key. If the wires touch the other key parts, or if they touch the vise grips/clamp, the electrical resistance will be 0 ohms instead of the proper value (523 ohms, 1130 ohms, 4750 ohms , etc). Thus, my strategy was to use multiple layers of cardboard or brown paper to insulate those metal parts, then clamp both sides of the wires to the resistor with the vise grip. I could have used electrical tape, but i didn’t find it.
I tried with thin cardboard first, but my tests were too hard to get the electrical connection, so i switched to brown paper, which worked better.
I cut tiny holes on each side of the key, for the electrical contact to come thru, without exposing the rest of the key.
I put the stripped ends of both wires on each side of the key, cover with another paper for insulation against the vise grips, then clamp from each end with vise grips – gently. I don’t want to damage anything, just keep it in place.
The other ends of the wires are stripped, and i fastened them to the electrodes of the multimeter with the twist connectors. Alligator clips would work better. The multimeter i set to the thousandths setting for ohms.
I had to adjust the wires, brown paper, and vise grip multiple times, until i got the proper resistance. It can’t be no connection, but also can’t be zero/0 resistance, which means the connection is bypassing the resistor. Once i got it stable, i knew i could go on-site to my car and try it.
Under the dash, i disconnected the wires at the clips. Although most other videos recommend cutting the wires from the clips (primarily to wire a resistor to it for a permanent bypass), i didn’t want to do that today. So instead, i took the other ends of the wires, put a tiny piece of cardboard in between the wires to insulate, and wrapped them with gaffers tape. My idea was to emulate the clip and shove it into the other 2-connector clip. Since i only needed it to work for a minute (to start the ignition), i felt it could work.
I had to re-clamp the side with the vise grip, but that was easy since i brought the multimeter, so i know when the connection is good. I shoved the other fake taped up clipped wires into the real clip (white/gray, not orange), and turned the ignition key to ON.
Notably, the SECURITY light turned off, and was not blinking. That means it is disabled, and the ignition will start. I turned the key, and i heard clicking, but it didn’t start. So i connected my Toyota’s battery to the Camaro’s w/jumper cables, and it started right up!
I drove it home right away without stopping the engine. Since i pulled the bypass cables out during driving, the SECURITY light illuminated solid while driving, but that wasn’t a problem as it only matters during startup.
Now the only think i have to do is wire up a semi-permanent bypass so it is drivable, and also decide whether to fix the system ($1000?). Maybe we’ll use “the club” or a brake lock.
Last year, i wrote some posts using Svelte w/a forms lib + validation. Now that SvelteKit 1.0 is out, it includes new Form features, specifically Form Actions, which is a great way to do form handling in a very natural way for web browsers and web apps.
Here, i’m intending to build a proof-of-concept which does the following:
Use the Form Actions feature in /Kit
Create a TS class which maps to what the formData will contain
Use the yup validation library for validating the form submission
on failure of validation, return the error plus the form data object back to re-render the field in the form already entered, so the user doesn’t have to re-enter
use:enhance support for non-JS web clients
Although this is based on my prior Svelte Form posts, i took influence from WebJeda’s video on SvelteKit forms and validation. In my case, i go an extra step to implement a dynamic form with arrays.
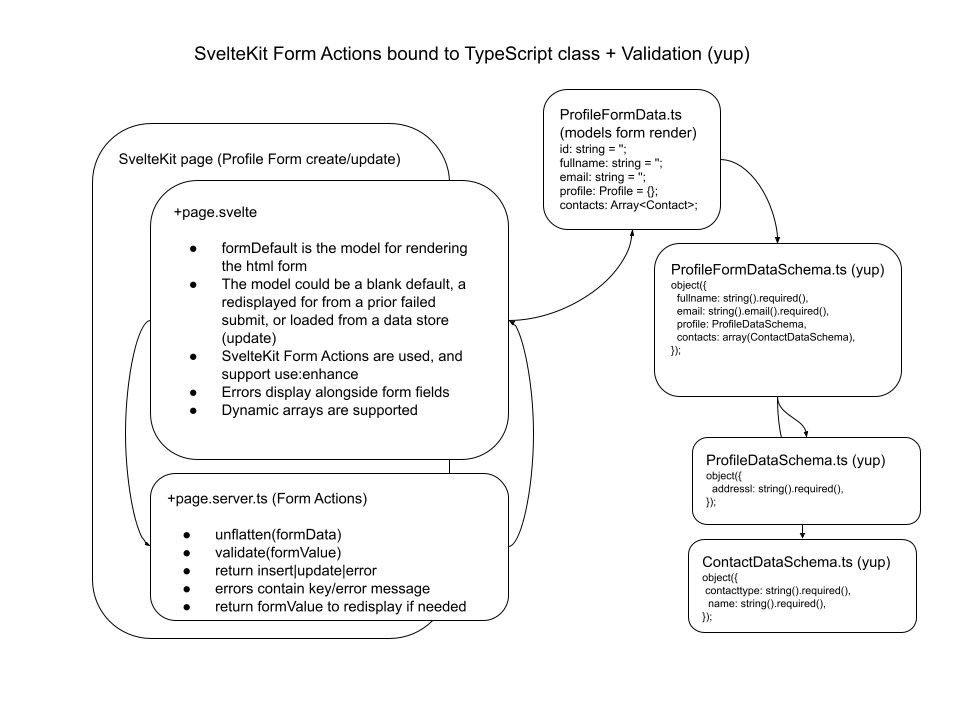
Architecture
create +page.svelte for page w/form (create/update)
create +page.server.js for handling the Form Actions
create a class which maps to the form values: ProfileFormData.ts
create validation classes for use in the form actions ‘create’ | ‘update’ before the mutation in the hypothetical data store.
Validation errors get returned back to the +page.svelte form for redisplay
dynamic array in the FormData object will add form fields and support validation
I’m not going to use a form library, only native SvelteKit features, such as form actions, PageData load() from *.server.ts, bind:value on <input>, and the reactive $: variables.
+page.svelte
The +page.svelte is the heart of the functionality. Under SvelteKit, it will run both client-side JS and server-side JS.
Since we define a matching +page.server.ts, that will run first – server-side only. If one of the form actions return, the +page.svelte receives as form ActionData property.
/** @type {import('./$types').ActionData} */
export let form;
If this is a first page load, nothing is in the form property, so we create a new ProfileFormData() to render the HTML form on-screen.
But if this is either a re-render after a invalid ‘create’ form submit, or if it is an ‘update’ form after loading the record from the data source, the form.formValue contains the structure of the form to render, as well as the data values to populate it.
    // formDefault must match the shape of the form to be rendered
    // and also fill in the defaults or the prior form submission w/ validation errors
    $: formDefault = setFormDefault(form?.formValue);

    // $: console.log('formDefault ', formDefault);
    // $: console.log('form.formValue changed ', form?.formValue);

    function setFormDefault(formValue) {
        if(formValue) {
            console.log('setFormDefault() from form.formValue');
            console.log('formValue: ', formValue);
            return formValue;
        }
        else {
            console.log('setFormDefault() from new ProfileFormData()');
            return new ProfileFormData();
        }
    }
+page.server.ts
The +page.server.ts is dedicated primarily for handling the SvelteKit Form Actions. In my case, i define two – one for ‘create’ and one for ‘update’. I will handle both cases in the +page.svelte <form>, since most fields are shared.
flat form parameter list to unflatten() JS nested object
I do use the unflatten() function from the ‘flat’ package. This allows for mapping a “flat” parameter list in formData() like:
When the form input elements are written out, i have to construct the names to match the array index format, such are contacts.0.propertyname, contacts.1.propertyname.
At the form POST handler in +page.server.ts, they get mapped back to a real JS array. After which, the object can be validated. If it passes, save to the data store. If it fails validation, return error status, plus the list of validation errors, as well as the form object data, so it may be redisplayed in the form fields without requiring re-entry.
// formValue will model the form rendering
// it could be a default value, or else a validation error response to modify and resubmit
let formValue: {[key: string]: string};

export const actions: Actions = {
  create: async ({ cookies, request }) => {
    console.log("action: create");
    const fd = await request.formData();
    console.log("fd.forEach() ");
    fd.forEach((val, key) => {
      console.log(`${key}: `, val);
    });
    //formValue = formDataToProfileData(fd);
    formValue = formDataToFormValue(fd);
    console.log("formValue ", formValue);
    console.log("flatten(formValue) ", flatten(formValue));
    console.log("unflatten(formValue) ", unflatten(flatten(formValue)));

    // do create
    try {
      const result = await profileFormDataSchema.validate(formValue, validateOptions);
    }
    catch(error) {
      console.log('error: ', error);
      console.log('error.value: ', error.value);
      const errors = error.inner.reduce((acc, err) => {
        return { ...acc, [err.path]: err.message };
      }, {});
      console.log('errors: ', errors);

      return {
        status: 'error',
        errors: errors,
        formValue: {...error.value},
      };
    }

    return {
      status: 'inserted',
      formValue,
    };
  },
Challenges in mutating the JS object arrays vs. copying them (bind:value problems)
One of the problems in binding the dynamic array form elements to their matching JS object array elements is that i couldn’t recreate the formDefault.contacts = [] array without losing the reference in <input bind:value={formDefault.contacts[idx].contacttype} />
Once i create the form object with the contacts array, i needed to keep the reference and not bash/overwrite it. So when implementing the [add contact] and delete contact [X] links, i use the array.push() and array.splice() methods, to modify the original reference only.
I’m using Svelte+Kit for new development, and also starting to use DaisyUI, i found a need to use the Toast component to show a message which appears for a while, then disappears, such as an error message on a form submit, or a success message.
Creating a Svelte component called Toast.svelte would be easy. The challenge is to wrap a callable function to invoke the functionality which would:
make the Toast visible
set the message, and the alert style (success, error, etc)
allow it to disappear after X seconds automatically
To start, i made the simple component, which would have an exported message and alerttype props.
That allowed me to invoke the Toast from the parent +page.svelte like so:
<script lang="ts">
export let toastMessage = 'some error message';
export let toastAlertType = 'alert-error';
</script>

<Toast message={toastMessage} alerttype={toastAlertType} />
Then i could write a page-level function callToast(), or even a *.ts library, but that was too messy. I want the callable function withing the same Toast.svelte component file.
I did it using the Svelte bind:this element directive.
I was just porting a hybrid mobile web app from Ionic+Angular to SvelteKit+Capacitor, and there was a qrcode generator page, where a number of qrcodes get generated in a sequence.
I wasn’t happy with the custom libraries so i opted to use the generate node-qrcode package, which supports the ESM import syntax. Some other libs expect you to import a script over the web, but i need something that will package up (Vite+capacitor).
The problem i had is that the example code uses a <canvas> element, which gets populated via DOM manipulation:
// index.js -> bundle.js
var QRCode = require('qrcode')
var canvas = document.getElementById('canvas')

QRCode.toCanvas(canvas, 'sample text', function (error) {
  if (error) console.error(error)
  console.log('success!');
})
My approach was to put the above code in a svelte component (Qrcode.svelte) which would do the work. Then its is called like so:
<!-- +page.svelte -->
<script lang="ts">
import Qrcode from '$components/Qrcode.svelte';
import { writable, type Writable } from 'svelte/store';

let tagIds: Writable<Array<string>> = writable(['101', '102', '103', '104']);
let qrcodeWidth = '160';
</script>

<div>
  <div>
    {#each $tagIds as tagId}
      <Qrcode value={tagId} width={qrcodeWidth} errorCorrection="M" />
      <div class="tagid-caption">{tagId}</div>
    {/each}
  </div>
</div>
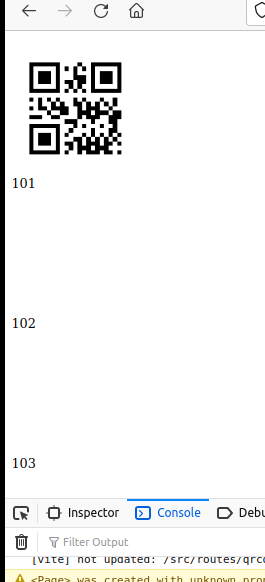
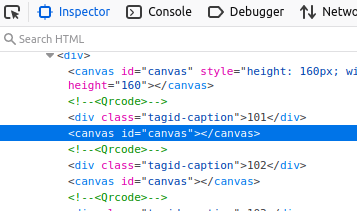
Now the problem is that only one qrcode gets written:
The reason is that when svelte creates each component in the DOM, they will all have the same ID, which we definitely don’t want – each ID and code must be unique.
It turns out the “right way” to address a DOM element in a Svelte component is to use the bind:this syntax.
We create a variable for the canvas element, use bind:this={canvas} in the <canvas> html tag, and in onMount(), QRCode.toCanvas(canvas).
<!-- Qrcode.svelte -->
<script>
import QRCode from 'qrcode';
import { onMount } from 'svelte';

// https://stackoverflow.com/a/58015980/408747
// we use bind:this so this component can bind qrcode to the particular canvas in the DOM
// svelte will create unique DOM ids for each component
let canvas;

export let value = '';
export let width = '200';
export let errorCorrectionLevel = 'M';

const options = {
    errorCorrectionLevel,
    width,
};

onMount(() => {
    QRCode.toCanvas(canvas, value, options, function (error) {
        if (error) console.error(error);
    })
});

</script>

<canvas bind:this={canvas}></canvas>
Now we have canvas elements w/unique qrcodes, using a normal Svelte component and a vanilla ESM JavaScript QRcode library. 😊
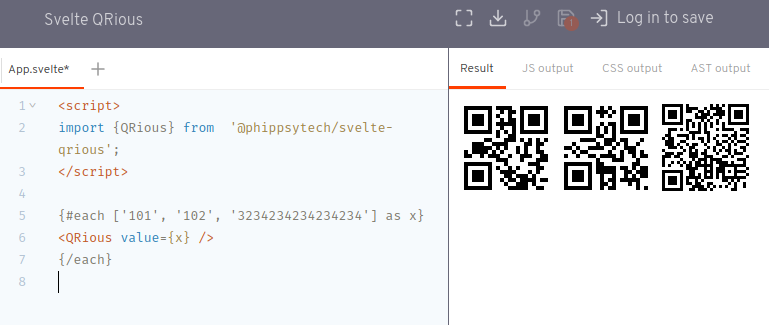
Update: after posting, i just was made aware of a new svelte qrcode generator package – phippsytech/svelte-qrious. It uses the bind:this in the component definition, like i explained. But it’s an installable npm package, with a REPL.
This is a short and sweet example of using a SvelteKit frontend project with Nhost authentication.
Overview
Nhost is the serverless backend built on Hasura (graphql server backend). NHost is built on it’s open source Hasura Auth library (using JWTs). They are nearing v2 official release and have sample templates for React and Next.js, but not Svelte yet, so i thought i’d show a simple implementation.
Open Source 100%: it is possible to self-host the entire system if you want to leave the provider for any reason. This is big for me.
Integrated with and built on Hasura: I already decided on using Hasura for it’s role-based authorization, low-code model on top of real relational dbs like PostgreSQL.
Fills needed gaps in Hasura: authentication and storage.
To demonstrate, i’m going to rely on a few things in Svelte and Nhost, which can hook up nicely:
Svelte writable() store to observe changes in the authentication status and logged in user, and re-render UX component changes in real-time.
Nhost auth’s onAuthStateChanged() event handler, which will update the writable() stores whenever a user is logged in or out, or their token expires.
Combining an auth state change handler with an Observable Svelte store linked to a UI component – will ensure authentication always is in sync with the user interface, using the least friction in the code. Less bloat == less bugs.
Those are the main things. I’ll also implement a SvelteKit layout, couple pages to route, a login form / logout button, and “login status box” component which can be included in various places on the app. Plus a Vite.env file, just because its the SvelteKit way and Vite rocks super fast (transpilers to ES5 need to die). I may use TypeScript, but Javascript works just as well (except for the bug in my event handler which i didn’t find until using TS 😡).
Create Nhost Project
Nhost.io is a backend as a service provider, built using Hasura plus Nhost’s own open source Hasura Auth and storage (AWS style). They have a CLI for running locally on your dev machine in a container, but for this demonstration, i will just create a new free service.
Once you have a login registered (Github login supported),
create or select a workspace
create a new App (select region, and free plan)
Once the app is deployed, you can copy the Nhost backend url ( https://{long-identifier}.nhost.run ), which you will need to access in your project’s .env file. Also available are tabs for:
Hasura Console (w/admin secret)
User Management (a simply UI for managing user records, which your app will use)
Storage (for any future file storage your app uses)
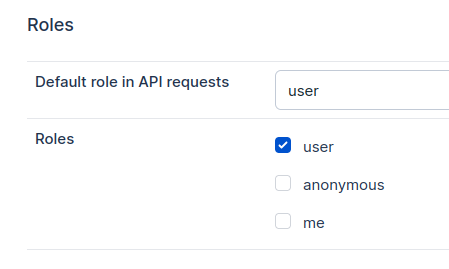
Typically, your application will access resources with these users. When you design your app, you will configure roles for authorization to your Hasura resources, and the Nhost user roles will also map to the same roles.
Typically, the anonymous role is “anonymous” or “public”. It’s configurable.
In my opinion, the role authorization system is a major plus of this backend stack. Since they use JWTs, it can scale out to multiple Hasura instances and even other backends, as long as they support JSON Web Tokens and are configured with a shared secret. And Hasura’s row-level authorization has the potential to cut out tons of boilerplate code for authorization.
Create SvelteKit Project
Next, let’s create a SvelteKit project with __layout.svelte and a couple pages.
npm init svelte nhost-sveltekit-auth-test
cd nhost-sveltekit-auth-test
code .
We’re going to have an index page, login page (which will later switch between a login form and a logout function, depending on status), and the layout page will contain a simple navigation, as well as a little component.
// nhost client

import { NhostClient, type NhostClientConstructorParams } from "@nhost/nhost-js";
import { writable } from "svelte/store";

export const VITE_NHOST_BACKEND_URL = import.meta.env.VITE_NHOST_BACKEND_URL as string;

export const config: NhostClientConstructorParams = {
    backendUrl: VITE_NHOST_BACKEND_URL,
};

export const nhost = new NhostClient(config);

// store
export const isSignedIn = writable(null);
export const user = writable(null);

nhost.auth.onAuthStateChanged(
    (event, session) => {
        console.log(`auth state changed. State is now ${event} with session: `, session);
        if (event === 'SIGNED_IN') {
            isSignedIn.set(true);
            user.set(session?.user);
        }
        else {
            isSignedIn.set(false);
            user.set(null);
        }
    }
);

export async function signIn(parameters) {
    // console.log("signIn(parameters): ", parameters);

    let params = {
        email: parameters.email,
        password: parameters.password,
    };

    if (parameters.email) {
        params.email = parameters.email;
    }
    if (parameters.password) {
        params.password = parameters.password;
    }

    // TODO: sanitize inputs

    const data = await nhost.auth.signIn(params);

    return {
        ...data,
    };
}
nhost.auth.onAuthStateChanged() handler
By leveraging Nhost’s onAuthStateChanged() event handler, every time there is an authentication change (signin, signout, for any reason like user-initiated or token expriation), we update the svelte stores/observables with the updated values. In turn, all the components can immediately re-render to update based on the new state. That includes both the login form, as well as the status box component, appearing all over the application. With very little code involved.
In the form.svelte page, it contains the bare <form> element, and the createForm() call which returns $form, $errors, and the handle* functions. We add new setContext() call, setting those objects. This will allow child components to getContext() and access the same objects, without requiring them to be passed in via props.
const { form, errors, state, handleChange, handleSubmit, handleReset }
  = createForm(formProps);

// allows for referencing the internal $form and $errors from this page,
// so we can add the array handlers
setContext(key, {
	form,
	errors,
	handleChange,
	handleSubmit,
});
Now in the child components, add getContext() and modify the use.
ZInput <script> section:
// allows the Form* components to share state with the parent form
const { form, errors, handleChange } = getContext(key);
Then we won’t have to pass in those objects via prop. However, we still have a problem…
Impedance-mismatch: flat $errors keys vs. hierarchical $forms object
As discussed in my prior post, the underlying $form store is “flat”, but the underlying svelte store is hierarchical, meaning we have to refer to $form by that flat key. For example:
$form
$errors
$form[‘fullname’]
$errors.fullname
$form[‘profile.address’]
$errors.profile.address
$form[‘contacts[0].name’]
$errors.contacts[0].name
$form[‘contacts[2].name’]
$errors.contacts[2].name
I think this is the inevitable mismatch where the html form has a list of flat “name”s in a traditional POST, but the data it is handling is hierarchical.
If we try to use the key passed in for “name”, it won’t work to find the matching error message. So we have to convert the string key “contacts[2].name” to the equivalent object reference $errors.contacts[2].name in order to display the linked error message (if any).
I ended up using a function from stack overflow, which allows me to pass in an object, and a string key, which returns the value from the object the string key would point to:
In this post, i will attempt to extract the “sveltey” html into a couple components. I’ll just name them with a Z-prefix for kicks.
a component with the label + input type=text + error (ZInput)
a component with the label + input type=radio + error (ZRadio)
Creating them under src/lib/c/*.svelte
The idea here is to supply all the variables in the component as props (a la Component Format), so the components are relatively generalized in the app, and we can set them in our existing each loops for the form.
ZInput : input type=text
Let’s start simple – the text input. Our first example looks like this:
itemValueChecked (if there is a pre-checked item – single choice)
errorText
handleChange
And we get…
<script>
    export let nameAttr;
    export let nameLabel;
    export let itemList;
    export let itemValueChecked;
    export let errorText;
    export let handleChange;

    function isChecked(checkedValue, itemValue) {
        if(checkedValue === itemValue) {
            return true;
        }
        else {
            return false;
        }
    }
</script>
<div>
    <label for={nameAttr}>{nameLabel}</label>
    {#each itemList as p, i}
        <label class="compact">
            <input
                type="radio"
                id={`${nameAttr}-${p.value}`}
                name={nameAttr}
                value={p.value}
                on:change={handleChange}
                on:blur={handleChange}
                checked={isChecked(itemValueChecked, p.value)}
            />
            <span> {p.label}{#if p.label != p.id}[{p.id}]{/if}</span>
        </label>
    {/each}
    {#if errorText}
        <div class="error-text">{errorText}</div>
    {/if}
</div>
Now the instantiation is a little more complex, as we’ll have to alter or remap the itemList objects to a consistent keys. For simple, non-object array lists, the id, name, label, and value are all the same. But the complex object lists, they are distinct.
The ZRadio component code:
<script>
    export let nameAttr;
    export let nameLabel;
    export let itemList;
    export let itemValueChecked;
    export let errorText;
    export let handleChange;

    function isChecked(checkedValue, itemValue) {
        if(checkedValue === itemValue) {
            return true;
        }
        else {
            return false;
        }
    }
</script>
<div>
    <label for={nameAttr}>{nameLabel}</label>
    {#each itemList as p, i}
        <label class="compact">
            <input
                type="radio"
                id={`${nameAttr}-${p.value}`}
                name={nameAttr}
                value={p.value}
                on:change={handleChange}
                on:blur={handleChange}
                checked={isChecked(itemValueChecked, p.value)}
            />
            <span> {p.label} [{p.id}]</span>
        </label>
    {/each}
    {#if errorText}
        <div class="error-text">{errorText}</div>
    {/if}
</div>
Building new web apps in 2021 using a Svelte front-end is fun, with more reactivity and less code. Almost any web app will have some kind of form, and it helps to have a basic form builder and validation framework.
In this post, i’ll be exploring the svelte-forms-lib library to create a form, bound to a hierarchical object, and also wired up to a validation object. The form will support dynamically adding/removing items from an array property. It will also support radio buttons, which must be handled differently, since they are multiple <input> elements tied to the same variable.
Building a Complex Form, with svelte-forms-lib
The form i want to build will be a mix of property types:
Simple properties, such as ‘fullname’ (text input) and ‘prefix’ (radio button input)
A named object property (‘profile’), which will have a subsection for key/value pairs like ‘address’ and ‘gender’
A named array property (‘contacts’), which can contain zero or more contacts (with properties ‘name’, ’email’, and ‘contacttype’)
These various properties will have their own validation rules, which we will deal with later. They will also be sent to the backend on form submit, as a single JSON object. Something like this:
Now that we’ve visualized our data model on the client-side, we can build a form to allow the user to populate that. Our challenge is to manage the slight impedance-mismatch between a form builder library and the object structure. Plus, allowing for an easy to use validation system.
Creating the svelte project, and creating the form with arrays and text inputs
I’ll create a vanilla sveltekit project, but it just needs to be svelte 3:
npm init svelte@next enehana-complex-svelte-form
cd enehana-complex-svelte-form
npm install
npm run dev -- --open
Making a page under /src/routes/form.svelte for this example. I will put as much as possible in this one page for simplicity’s sake, but normally we would split a few things off, as desired.
npm install svelte-forms-lib
We’ll start with a simple <script> section and the html form elements. Our example will be based on the svelte-forms-lib Forms Array example. Let’s just use regular text inputs to start, but do our array which will support multiple contacts on the form.
script section will call createForm() with the initial properties, and return a $form and $errors observable/store for linking the form elements with the JS object.
This is a simple 2 input form, but you can see the 2-way binding in action:
Now let’s add the dynamic contacts: [] array to the form. We loop using #each on the $form.contacts array, which we start empty. Each time we click “add”, an object is pushed to the array, which is bound to a new form group. Those inputs will be bound to the item of the array, based on their 0-based index value (0, 1, 2, …).
The importance of the name=”” attribute matching the bound js object
We must keep in mind that the HTML form and the $form store is a more “flat” key/value pair data structure, whereas the object is it bound to is a dynamic javascript object, which can easily model hierarchical objects and arrays. This means the way we assign an <input name=””> needs to match the object. Otherwise, our form elements will modify the wrong sections of the object. I had a lot of trouble with this until i figured it out.
The <input> maps by the name=”” attribute, or the id=”” attribute if there is no name. The name/id attribute will be the key in the $formsvelte store observable, as well as the matching $errors store.
Examples of the 2-way binding between form and objects:
{#each $form.contacts as c, x} <input name={`contacts[${x}].name`} bind:value={$form.contacts[x].name} /> {/each}
$form.contacts[x].name
{#each $form.contacts as c, x} {#each contactTypes as ct, y} <label> <input type=”radio” name={`contacts[${x}].contacttype`} value={ct} /> {ct} </label> {/each} {/each}
$form.contacts[x].contacttype
It can get a little complicated on the html form side, but i like it clear on the javascript side. Theoretically, the HTML could be wrapped into a svelte component to make the syntax cleaner. Let’s leave that to another day.
set it as the validationSchema in the svelte-forms-lib createForm
throw in the html $errors next to the form fields, for a visual feedback on invalid data
The validation will run at <form on:submit={handleSubmit}> by svelte-forms-lib, and optionally at the input form element level if you add the on:change={handleChange} and/or on:blur={handleChange} svelte attributes.
Note that onSubmit() doesn’t fire until all the forms pass yup validation.
Handling radio buttons and checkboxes
Radio buttons and checkboxes require special handling. At first i thought i had to wire up my own idiom between svelte-forms-lib and svelte bind:group handler, but it turns out not to be the case.
Sometimes a radio, checkbox, or select drop down will have a list of simple values. In other cases, there could be complex values, in the cases where a list of items is pulled from a databases. There could be a product_id to store, but a product_name to display. I’m going to try examples of each.
The simple examples will be prefixes and genderOptions. We defined them as simple arrays:
For ‘prefix’, we have a similar label, but instead of one <input>, we get one for each option. So we loop thru the options using an {#each} loop, being careful to:
set all name=”” attributes to the same input name
set the value=”” to the actual value to store in the variable
And with Contact Type, we need to include the array indexer in the name=”” attribute, so we don’t stomp on values from other array items. It is already inside another {#each} loop, iterating over $form.contacts
My takeaway is that based on this test of more complex form building and validation using svelte, i’m now confident i could build larger web apps the way i expect — with validation and dynamic forms, including arrays.
I am in the middle of my about once or twice-a-decade process of reevaluating my entire web software development tools and approaches. I’m using a number of great new tools, but a new little JS lib i’m starting to use to tie them all together, hopefully in a resilient way: graphql-ws
The target audience for this post is a web developer using a modern GraphQL backend (Hasura in this case) and a modern reactive javascript/html front-end (in this example, Svelte).
This post is about the reasons for my tech stack choices, and how to use graphql-ws to elegantly tie them together.
Software Stack Curation
What is Hasura? Why use it?
Hasura, in my mind, is a revolutionary new backend data server. It sits in front of a database (PostgreSQL or others), and provides:
Instant GraphQL APIs (which are typed)
Configurable Authorization of resources, integrated at the SQL composition level
Bring your own Authentication/Authorization provider (using JWTs or not), such as NHost, Auth0, Firebase, etc.
Integrate with other GraphQL sources
Integrate hooks with serverless functions/lambda
Open Source (self-host or cloud service)
Local CLI for developers
This can eliminate extensive hand-coding of backend REST APIs, with the custom cross-cutting concerns, like Auth. Also replaces the need for OR/M-style data access in backend code.
What is GraphQL? Why use it?
Now, this was my question a couple years ago, until i saw Hasura v1. Now i can answer it.
A query language for your API GraphQL is a query language for APIs and a runtime for fulfilling those queries with your existing data. GraphQL provides a complete and understandable description of the data in your API, gives clients the power to ask for exactly what they need and nothing more, makes it easier to evolve APIs over time, and enables powerful developer tools.
In slightly more normal coder-speak, it is a defacto standard for querying and mutating (insert/update/delete) a data source over the web, sending a GQL statement, executing it, and receiving a response in JSON.
GraphQL consoles are “aware” of the underlying database types, which makes it easy to:
Compose queries in a console like “graphiql” and test them
Then copy/paste your GQL into your Javascript client code editor, for run-time execution
Arguably, this is less work than hand-coding the SQL or ORM code into your REST endpoint code. The JSON response comes for free. GraphQL also makes it easy to merge multiple data sources into a single JSON response.
What is Apollo Client? Why use it, and why would i not use it?
Apollo is a GraphQL client and server library. It is popular and there are many code examples for developers available. Since i am using Hasura i don’t need the Apollo Server, but i could use the Apollo Client to access my backend.
My initial tests worked with it. However the Apollo Client also has its own state-management system for caching gql queries and responses. It seemed like an overkill solution for my uses. I’m sure it works for other projects, but since the new concept count (to learn) in this case is already high, i opted to not use it.
This worked good and was simple to understand, but only for queries and mutations, not subscriptions.
For gql subscriptions, there was a different library: apollographql / subscriptions-transport-ws . It is for graphql subscriptions over web sockets. We would want this in the case of a web UX which listens for changes in the underlying data, and reactively updates when it changes on the server.
What is graphql-ws? Why use it instead of subscriptions-transport-ws?
subscriptions-transport-ws does work, but there are 3 reasons not to use it:
Bifurcated code – you have to use one lib for gql queries+mutations, and another for subscriptions
graphql-ws implements a more standard GraphQL over WebSocket Protocol, using ping/pong messages, instead of subscriptions-transport-ws GCL_* messages.
Apparently subscriptions-transport-ws is no longer actively maintained by the original developers, and they recommend using graphql-ws on their project page.
The GraphQL specification allows for something called subscriptions that are like GraphQL queries but instead of returning data in one read, you get data pushed from the server.
This is useful for your app to subscribe to “events” or “live results” from the backend, while allowing you to control the “shape” of the event from your app.
GraphQL subscriptions are a critical component of adding realtime or reactive features to your apps easily. GraphQL clients and servers that support subscriptions allow you to build great experiences without having to deal with websocket code!
Put another way, our front-end UX can “listen” for changes on the backend, and the backend will send the changes to the frontend over the web socket in real time. The “reactive” frontend can instantly re-render the update to the user.
Not all graphql queries require using a subscription, but if we do use them, coding them will be much simpler to write and maintain.
What is Svelte? Why use it?
Svelte is a Javascript front-end reactive framework (not unlike React), but it is succinct and performant, and implemented as a compiler (to JS). Plus, it is fun to learn and code in. I’m talking 1999- era fun 😊
You can use a different frontend framework. But Svelte makes it easy due to svelte “stores” implementing the observable contract– the subscribe() method. Components will reactively update if the underlying object being observed changes.
What are Javascript Observables? RxJS?
RxJS is a library for reactive programming using Observables, to make it easier to compose asynchronous or callback-based code.
We don’t need RxJS to use observables, but it is a popular library. I used it with Angular in the past, and one of the simplest graphql-ws examples uses it, so i am too.
In short, in Javascript you call an observable’s subscribe() method to listen for/handle updates in the observable’s value.
The wire-up: two-way reactive front-end to backend using JS Observables + GraphQL Subscriptions over Web Sockets
The idea here is to render the rapidly-changing data in an HTML component for the user to just watch updates, without having to do anything.
Design – Focus-group input slider
This proof-of-concept will be a slider for use in a “focus group”. A group of participants get in a room and watch a video or debate, and “dial” in real-time their opinion (positive or negative) as things are being said. This example will just be a single person’s input being displayed or charted.
The data captured will include: focus group id (text), username, rating (integer – 0 to 100), and datetime of event.
UI will include:
A start/stop button, to start recording rating records, in 1 second increments.
A slider, which goes from 0 (negative/disagree) to 100 (positive/agree), default setting is 50 (neutral)
A grid/table will display the last 10 records recorded in real-time (implemented as a graphql subscription).
Optional: implement a chart component which updates in real-time from the data set.
Diagram
Code
Setup
npm init svelte@next fgslider
cd fgslider
code .
PostgreSQL
I want the table to look like this:
create table ratingtick (
   id serial,
   focusgroup text not null,
   username text not null,
   rating integer not null,
   tick_ts timestamp with time zone not null default current_timestamp
);

-- insert into ratingtick(focusgroup, username, rating) values ('pepsi ad', 'ekolu', 50);
-- insert into ratingtick(focusgroup, username, rating) values ('pepsi ad', 'ekolu', 65);
-- insert into ratingtick(focusgroup, username, rating) values ('pepsi ad', 'ekolu', 21);
In this case, i’m going to do it on my local machine. I’m also going to create the Hasura instance locally using hasura-cli. Of course, you can do this on your local infrastructure or your own servers or cloud provider, or the specialized NHost.io .
If you get a problem, just tweak docker-compose.yml. I changed the port from 8080:8080 to 8087:8080
Connect to the Hasura web console: http://localhost:8087
Connect the Hasura container instance to the Postgresql container instance:
Grab the database URL from docker-compose.yml and connect the database:
You will now see ‘pgcontainer’ in the databases list.
With Hasura, you can either create the Postgres schema first, then tell Hasura to scan the schema. Or create the schema in the Hasura console, which will execute the DDL on Postgres. Pick one or the other.
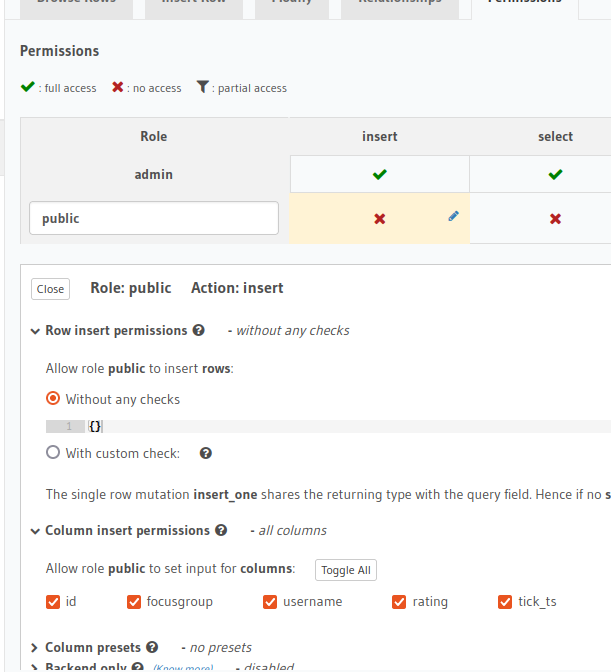
For this project, we’ll skip permissions, or more accurately, we’ll configure a ‘public’ role on the table, and allow select/insert/update/delete permissions.
Note: i had to add HASURA_GRAPHQL_UNAUTHORIZED_ROLE: public to the environment: section of docker-compose.yml and run “docker-compose up -d” to make it reload with the setting change, to treat anonymous requests as ‘public’ role (no need for x-hasura-role header).
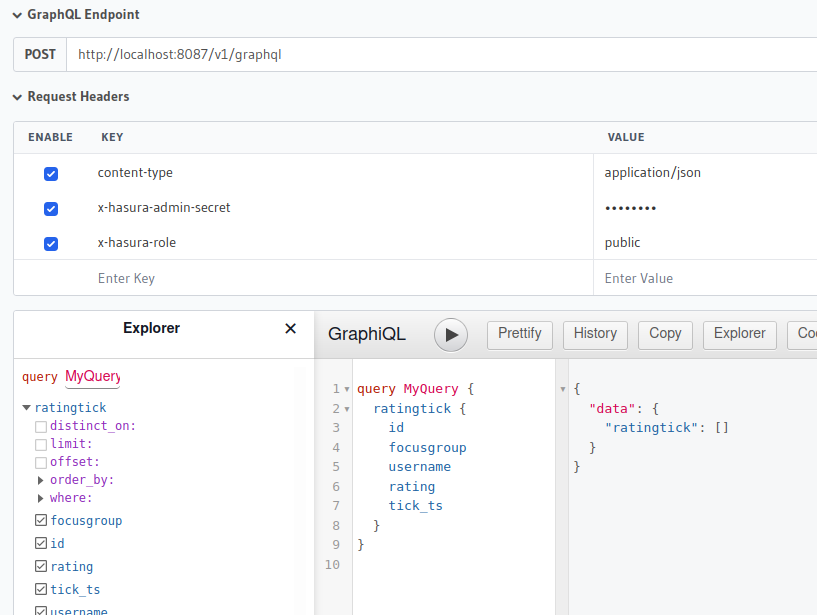
Let’s now test GraphQL queries in “GraphIQL” tool. We should be able to set the x-hasura-role header to ‘public’ and still query/mutate. Setting the role header requires Hasura to evaluate the authorization according to that role. (note i did have problems getting the role header to work, so i instead made ‘public’ the default anonymous role).
Finally, let’s test the subscription. We should be able to open the insert mutation in one window, and see the subscription update in real time in the second window.
Good. At this point, i’m confident all is working on the Hasura end. Time to work on the front-end code.
Svelte + graphql-ws
Please note that although i am using Svelte with graphql-ws , you can use any JS framework, or vanilla JS.
Remember, we created this directory as a sveltekit project, so now we’ll build on it. We do need to “npm install” to install the node dependencies. Then we can “npm run dev” which will run the dev http server on localhost:3000
Create a new /slider route as src/routes/slider/index.svelte
Add form inputs, and a slider widget
Add a display grid which will display the last 10 tick records
SvelteKit uses Vite for modern ES6 module builds, which uses dotenv-style .env, but with the VITE_* prefix. So we create a .env file with entry like so:
VITE_TEST="this is a test env"
VITE_HASURA_GRAPHQL_URL=ws://localhost:8087/v1/graphql
Note: you must change the URI protocol from http://localhost:8087/v1/graphql to ws://localhost:8087/v1/graphql , in order to use graphql-ws. It is not normal http, it is web sockets (ws://) or ws secure (wss://). Otherwise, you get an error: [Uncaught (in promise) DOMException: An invalid or illegal string was specified client.mjs:140:12]
Then you can refer to them in your app via the import.meta.env.* namespace (src/routing/index.svelte):
Now let’s get into the “fish and poi” a/k/a “meat and potatoes” section, the src/routes/slider/index.svelte page.
First, the start/stop button, form elements and slider widget. Keeping it simple,
I will install a custom svelte slider component:
npm install svelte-range-slider-pips --save-dev
Also installing rxjs, for the timer() and later for wrapping the graphql-ws handle.
npm install rxjs
The first version here is basically a svelte app only, not using any backend yet:
<script>
import { text } from "svelte/internal";
import RangeSlider from "svelte-range-slider-pips";
import { timer } from 'rxjs';

let runningTicks = false;
let focusGroupName = "pepsi commercial";
let userName = "ekolu";
let sliderValues = [50]; // default
let tickLog = "";

let timerObservable;
let timerSub;

function timerStart() {
   runningTicks = true;
   timerObservable = timer(1000, 1000);

   timerSub = timerObservable.subscribe(val => {
       tickLog += `tick ${val}... `;
   });
}

function timerStop() {
   timerSub.unsubscribe();
   runningTicks = false;
}

</script>

<h1>Slider</h1>
<p>
   enter your focus group, name and click 'start'.
</p>
<p>
   Once it starts, move the slider depending on how much you
   agree/disagree with the video.
</p>

<form>
<label for="focusgroup">focus group: </label><input type="text" name="focusgroup" bind:value={focusGroupName} />
<label for="username">username: </label><input type="text" name="focusgroup" bind:value={userName} />

<label for="ratingslider">rating slider (0 to 100): </label>

<RangeSlider name="ratingslider" min={0} max={100} bind:values={sliderValues} pips all='label' />
<div>0 = bad/disagree, 50 = neutral, 100 = good/agree</div>
<div>slider Value: {sliderValues[0]}</div>

<button disabled={runningTicks} on:click|preventDefault={timerStart}>Start</button>
<button disabled={!runningTicks} on:click|preventDefault={timerStop}>Stop</button>
</form>
<div>
   Tick output: {tickLog}
</div>

<div>
   <a href="/">Home</a>
</div>
I got a number of things working together here:
Variables bound to UI components
A slider component which will have values from 0 to 100, bound to variable
An rxjs timer(), which executes a callback every second, bound to the start/stop buttons
Now i’m ready to hook up the graphql mutation and subscription.
npm install graphql-ws
I’m going to create src/lib/graphql-ws.js to manage the client setup and subscription creation.
import { createClient } from 'graphql-ws';
import { observable, Observable } from 'rxjs';

export function createGQLWSClient(url) {
    // console.log(`createGQLWSClient(${url})`);
    return createClient({
        url: url,
    });
}

export async function createQuery(client, gql, variables) {
    // query
    return await new Promise((resolve, reject) => {
        let result;
        client.subscribe(
            {
                query: gql,
                variables: variables
            },
            {
                next: (data) => (result = data),
                error: reject,
                complete: () => resolve(result)
            }
        );
    });
}

export async function createMutation(client, gql, variables) {
    // same as query
    return createQuery(client, gql, variables);
}

export function createSubscription(client, gql, variables) {
    // hasura subscription
    // console.log("createSubscription()");
    const operation = {
        query: gql,
        variables: variables,
    };
    const rxjsobservable = toObservable(client, operation);
    // console.log("rxjsobservable: ", rxjsobservable);
    return rxjsobservable;
}

// wrap up the graphql-ws subscription in an observable
function toObservable(client, operation) {
    // console.log("toObservable()");
    // the graphql-ws subscription may be cleaned up here,
    // not sure about the RxJs Observable
    // trying to make it more like the docs, w/custom unsubscribe() on subscription object
    // https://rxjs.dev/guide/observable
    return new Observable(function subscribe(subscriber) {
        client.subscribe(operation, {
            next: (data) => subscriber.next(data),
            error: (err) => subscriber.error(err),
            complete: () => subscriber.complete()
        });

        // Provide a way of canceling and disposing resources
        return function unsubscribe() {
            console.log("unsubscribe()");
        };
    });
}
Now we are going to:
setup the client in the index.svelte onMount() handler,
execute createSubscription() in the onMount() handler and bind to a new grid/table component
execute createMutation() on every tick with the current values
// browser-only code
onMount(async () => {
	// setup the client in the index.svelte onMount() handler
	gqlwsClient = createGQLWSClient(import.meta.env.VITE_HASURA_GRAPHQL_URL);

	// execute createSubscription() in the onMount() handler

	// and bind to a new grid/table component
	// src/components/TopTicks.svelte
	const gql = `subscription MySubscription($limit:Int) {
ratingtick(order_by: {id: desc}, limit: $limit) {
id
focusgroup
username
rating
tick_ts
}
}`;
	const variables = { limit: 5 }; // how many to display
	const rxjsobservable = createSubscription(
		gqlwsClient,
		gql,
		variables
	);
	// const subscription = rxjsobservable.subscribe(subscriber => {
	// 	console.log('subscriber: ', subscriber);
	// });
	// console.log('subscription: ', subscription);
	// gqlwsSubscriptions.push(subscription);
	gqlwsObservable = rxjsobservable;
});
Timer start
   function timerStart() {
       runningTicks = true;
       timerObservable = timer(1000, 1000);

       timerSub = timerObservable.subscribe((val) => {
           tickLog += `tick ${val}... `;

           // execute createMutation() on every tick with the current values
           submitLatestRatingTick(gqlwsClient);
       });
   }
I have been looking into implementing partial updates using the HTTP PATCH method using ServiceStack.net and the JSON Patch format (RFC 6902)
This is of interest since many updates do not neatly match the PUT method, which often is used for full entity updates (all properties). PATCH is intended to do one or more partial updates. There are a fewblogsdescribing the use cases.
I’ve been happy using ServiceStack the way it was designed – RESTful, simple, using Message Based designs.
I could implement PATCH using my own message format – that is easy to do. Usually it would be the actual DTO properties, plus a list of fields which are actually going to be updated. You wouldn’t update all fields, and you don’t want to only update non-null properties, since sometimes “null” is a valid value for a property (it would be impossible to set a property to null from non-null).
In my opinion, using JSON Patch for the Request body has pros and cons.
Pros:
is an official RFC
covers a lot of use cases
Cons:
very generic, so we lose some of the benefit of strong typing
doesn’t have a slot for the Id of a resource when calling PATCH /employees/{Id}
doing this the “JSON Patch way” would be { “op”: “replace”, “path”: “/employees/123/title”, “value”: “Administrative Assistant” } , but that wastes the value of having it on the routing path.
JSON Patch supports a handful of operations: “add”, “remove”, “replace”, “move”, “copy”, “test”. I will focus on the simple “replace” op, since it easily maps to replacing a property on a DTO (or field in a table record).
I’m going to ignore the If-Match: / ETag: headers for now. Those will be useful if you want to tell the server to only apply your changes if the resource still matches your “If-Match” header (no changes in the meantime). “That exercise is left to the reader.”
Let’s say we have a more practical example:
an Employee class, backed by an [Employee] table, accessed by OrmLite
an EmployeeService class, implementing the PATCH method
the Request DTO to the Patch() method aligns to the JSON Patch structure
The Employee class would simply look like this (with routing for basic CRUD):
[Route("/employees", "GET,POST")]
[Route("/employees/{Id}", "GET,PUT")]
public class Employee
{
    public long Id { get; set; }
    public string Name { get; set; }
    public string Email { get; set; }
    public string Title { get; set; }
    public int? CubicleNo { get; set; }
    public DateTime StartDate { get; set; }
    public float Longitude { get; set; }
    public float Latitude { get; set; }
}
Now the shape of JSON Patch replace ops would look like this:
The path is the property name in this case, and the value is what to update to.
And yes, i also know i am sending Content-Type: application/json instead of Content-Type: application/json-patch+json . We’ll have to get into custom content type support later too.
Now, sending a generic data structure as the Request DTO to a specific resource ID doesn’t cleanly map to the ServiceStack style, because:
each Request DTO should be a unique class and route
there is not a field in the Request for the ID of the entity
The simple way to map the JSON to a C# class would define an “op” element class, and have a List<T> of them, like so:
public class JsonPatchElement
{
    public string op { get; set; } // "add", "remove", "replace", "move", "copy" or "test"
    public string path { get; set; }
    public string value { get; set; }
}
We create a unique Request DTO so we can route to the Patch() service method.
[Route("/employees/{Id}", "PATCH")]
public class EmployeePatch : List<JsonPatchElement>
{
}
But how do we get the #$%&& Id from the route?? This code throws RequestBindingException! But i can’t change the shape of the PATCH request body from a JSON array [].
The answer was staring me in the face: just add it to the DTO class definition, and ServiceStack will map to it. I was forgetting the C# class doesn’t have to be the same shape as the JSON.
[Route("/employees/{Id}", "PATCH")]
public class EmployeePatch : List<JsonPatchElement>
{
    public long Id { get; set; }
}
Think of this class as a List<T> with an additional Id property.
When the method is called, the JSON Patch array is mapped and the Id is copied from the route {Id}.
The only wrinkle is all the JSON values come in as C# string, even if they are numeric or Date types. At least you will know the strong typing from your C# class, so you know what to convert to.
My full Patch() method is below– note the partial update code uses reflection to update properties of the same name, and does primitive type checking for parsing the string values from the request DTO.
public object Patch(EmployeePatch dto)
{
    // partial updates

    // get from persistent data store by id from routing path
    var emp = Repository.GetById(dto.Id);

    if (emp != null)
    {
        // read from request dto properties
        var properties = emp.GetType().GetProperties();

        // update values which are specified to update only
        foreach (var op in dto)
        {
            string fieldName = op.path.Replace("/", "").ToLower(); // assume leading /slash only for example

            // patch field is in type
            if (properties.ToList().Where(x => x.Name.ToLower() == fieldName).Count() > 0)
            {
                var persistentProperty = properties.ToList().Where(x => x.Name.ToLower() == fieldName).First();

                // update property on persistent object
                // i'm sure this can be improved, but you get the idea...
                if (persistentProperty.PropertyType == typeof(string))
                {
                    persistentProperty.SetValue(emp, op.value, null);
                }
                else if (persistentProperty.PropertyType == typeof(int))
                {
                    int valInt = 0;
                    if (Int32.TryParse(op.value, out valInt))
                    {
                        persistentProperty.SetValue(emp, valInt, null);
                    }
                }
                else if (persistentProperty.PropertyType == typeof(int?))
                {
                    int valInt = 0;
                    if (op.value == null)
                    {
                        persistentProperty.SetValue(emp, null, null);
                    }
                    else if (Int32.TryParse(op.value, out valInt))
                    {
                        persistentProperty.SetValue(emp, valInt, null);
                    }
                }
                else if (persistentProperty.PropertyType == typeof(DateTime))
                {
                    DateTime valDt = default(DateTime);
                    if (DateTime.TryParse(op.value, out valDt))
                    {
                        persistentProperty.SetValue(emp, valDt, null);
                    }
                }

            }
        }

        // update
        Repository.Store(emp);

    }

    // return HTTP Code and Location: header for the new resource
    // 204 No Content; The request was processed successfully, but no response body is needed.
    return new HttpResult()
    {
        StatusCode = HttpStatusCode.NoContent,
        Location = base.Request.AbsoluteUri,
        Headers = {
            // allow jquery ajax in firefox to read the Location header - CORS
            { "Access-Control-Expose-Headers", "Location" },
        }
    };
}
For an example of calling this from the strongly-typed ServiceStack rest client, my integration test looks like this:
[Fact]
public void Test_PATCH_PASS()
{
    var restClient = new JsonServiceClient(serviceUrl);

    // dummy data
    var newemp1 = new Employee()
    {
        Id = 123,
        Name = "Kimo",
        StartDate = new DateTime(2015, 7, 2),
        CubicleNo = 4234,
        Email = "test1@example.com",
    };
    restClient.Post<object>("/employees", newemp1);

    var emps = restClient.Get<List<Employee>>("/employees");

    var emp = emps.First();

    var empPatch = new Operations.EmployeePatch();
    empPatch.Add(new Operations.JsonPatchElement()
    {
        op = "replace",
        path = "/title",
        value = "Kahuna Laau Lapaau",
    });

    empPatch.Add(new Operations.JsonPatchElement()
    {
        op = "replace",
        path = "/cubicleno",
        value = "32",
    });

    restClient.Patch<object>(string.Format("/employees/{0}", emp.Id), empPatch);

    var empAfterPatch = restClient.Get<Employee>(string.Format("/employees/{0}", emp.Id));

    Assert.NotNull(empAfterPatch);
    // patched
    Assert.Equal("Kahuna Laau Lapaau", empAfterPatch.Title);
    Assert.Equal("32", empAfterPatch.CubicleNo.ToString());
    // unpatched
    Assert.Equal("test1@example.com", empAfterPatch.Email);
}
I hope this has been useful to demonstrate the flexibility of using ServiceStack and C# to implement the HTTP PATCH method using JSON Patch (RFC 6902) over the wire.
Update: i refactored the code so that any object can have it’s properties “patched” from a JsonPatchRequest DTO by using an extension method populateFromJsonPatch().
public object Patch(EmployeePatch dto)
{
    // partial updates
    // get from persistent data store by id from routing path
    var emp = Repository.GetById(dto.Id);

    if (emp != null)
    {
        // update values which are specified to update only
        emp.populateFromJsonPatch(dto);

        // update
        Repository.Store(emp);