
Overview
Building new web apps in 2021 using a Svelte front-end is fun, with more reactivity and less code. Almost any web app will have some kind of form, and it helps to have a basic form builder and validation framework.
In this post, i’ll be exploring the svelte-forms-lib library to create a form, bound to a hierarchical object, and also wired up to a validation object. The form will support dynamically adding/removing items from an array property. It will also support radio buttons, which must be handled differently, since they are multiple <input> elements tied to the same variable.
Building a Complex Form, with svelte-forms-lib
The form i want to build will be a mix of property types:
- Simple properties, such as ‘fullname’ (text input) and ‘prefix’ (radio button input)
- A named object property (‘profile’), which will have a subsection for key/value pairs like ‘address’ and ‘gender’
- A named array property (‘contacts’), which can contain zero or more contacts (with properties ‘name’, ’email’, and ‘contacttype’)
These various properties will have their own validation rules, which we will deal with later. They will also be sent to the backend on form submit, as a single JSON object. Something like this:
{
    fullname: 'Keoki Gonsalves',
    prefix: 'Mr.',
    profile: {
        address: '123 Main St.',
        gender: 'M'
    },
    contacts: [
        {
            contacttype: 'friend',
            name: 'Gina Kekahuna',
            email: 'ginak@example.com',
        },
        {
            contacttype: 'aquaintance',
            name: 'Marlon Waits',
            email: 'mwaits@example.com',
        },
    ]
}
Now that we’ve visualized our data model on the client-side, we can build a form to allow the user to populate that. Our challenge is to manage the slight impedance-mismatch between a form builder library and the object structure. Plus, allowing for an easy to use validation system.
Creating the svelte project, and creating the form with arrays and text inputs
I’ll create a vanilla sveltekit project, but it just needs to be svelte 3:
npm init svelte@next enehana-complex-svelte-form
cd enehana-complex-svelte-form
npm install
npm run dev -- --open
Making a page under /src/routes/form.svelte for this example. I will put as much as possible in this one page for simplicity’s sake, but normally we would split a few things off, as desired.
npm install svelte-forms-libWe’ll start with a simple <script> section and the html form elements. Our example will be based on the svelte-forms-lib Forms Array example. Let’s just use regular text inputs to start, but do our array which will support multiple contacts on the form.
script section will call createForm() with the initial properties, and return a $form and $errors observable/store for linking the form elements with the JS object.
<script>
	import { createForm } from 'svelte-forms-lib';

	const formProps = {
		initialValues: {
			fullname: '',
			prefix: '',
			profile: {
				address: '',
				gender: ''
			},
			contacts: []
		},
		onSubmit: (values) => {
			console.log('onSubmit (via handleSubmit): ', JSON.stringify(values));
		}
	};

	const { form, errors, state, handleChange, handleSubmit, handleReset } = createForm(formProps);

	const addcontact = () => {
		console.log('addcontact()');
		$form.contacts = $form.contacts.concat({ name: '', email: '', contacttype: '' });
		$errors.contacts = $errors.contacts.concat({ name: '', email: '', contacttype: '' });
	};

	const removecontact = (i) => () => {
		$form.contacts = $form.contacts.filter((u, j) => j !== i);
		$errors.contacts = $errors.contacts.filter((u, j) => j !== i);
	};
</script>
Note there are add() and remove() functions for the contacts array and matching HTML form input sections.
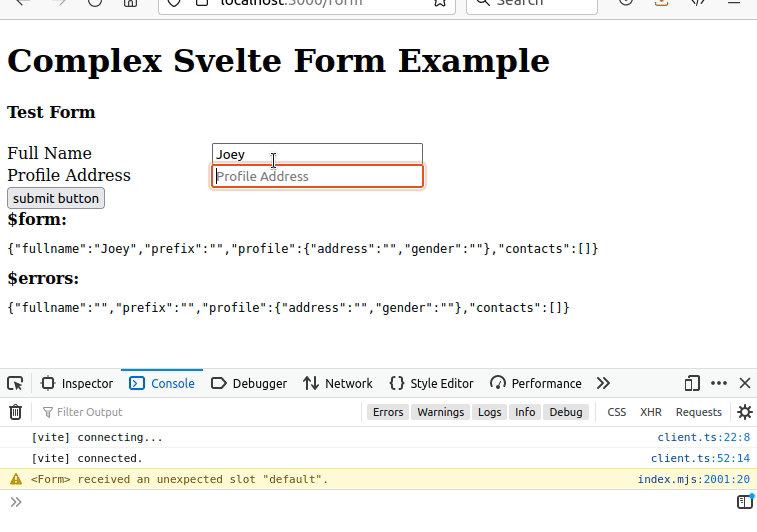
The HTML form we will build out to match, w/css.
<main>
<div>
	<h1>Complex Svelte Form Example</h1>

	<h4>Test Form</h4>
	<form on:submit={handleSubmit}>
		<div>
			<label for="fullname"> Full Name </label>
			<input
				type="text"
				name="fullname"
				bind:value={$form.fullname}
				class=""
				placeholder="Full Name"
				on:change={handleChange}
				on:blur={handleChange}
			/>
		</div>

        <div>
			<label for="profile.address">Profile Address </label>
			<input
				type="text"
				name="profile.address"
				bind:value={$form.profile.address}
				class=""
				placeholder="Profile Address"
				on:change={handleChange}
				on:blur={handleChange}
			/>
		</div>

		<input type="submit" name="submit" value="submit button" />
	</form>
</div>

<div>
	<b>$form: </b>
	<pre>{JSON.stringify($form)}</pre>
</div>
<div>
	<b>$errors: </b>
	<pre>{JSON.stringify($errors)}</pre>
</div>

</main>

<style>
    label {
        display: inline-block;
        width: 200px;
    }

	.error-text {
		color: red;
	}
</style>
This is a simple 2 input form, but you can see the 2-way binding in action:
Now let’s add the dynamic contacts: [] array to the form. We loop using #each on the $form.contacts array, which we start empty. Each time we click “add”, an object is pushed to the array, which is bound to a new form group. Those inputs will be bound to the item of the array, based on their 0-based index value (0, 1, 2, …).
        <h4>Contacts</h4>
        {#each $form.contacts as contact, j}
          <div class="form-group">
            <div>
              <label for={`contacts[${j}].name`}>Name</label>
              <input
                name={`contacts[${j}].name`}
                placeholder="name"
                on:change={handleChange}
                on:blur={handleChange}
                bind:value={$form.contacts[j].name}
              />
            </div>

            <div>
                <label for={`contacts[${j}].email`}>Email</label>
                <input
                placeholder="email"
                name={`contacts[${j}].email`}
                on:change={handleChange}
                on:blur={handleChange}
                bind:value={$form.contacts[j].email}
              />
            </div>

            {#if $form.contacts.length === j + 1}
                <button type="button" on:click={removecontact(j)}>[- remove last contact]</button>
            {/if}
          </div>
        {/each}

        {#if $form.contacts}
            <div>
                <button on:click|preventDefault={addcontact}>[+ add contact]</button>
            </div>
        {/if}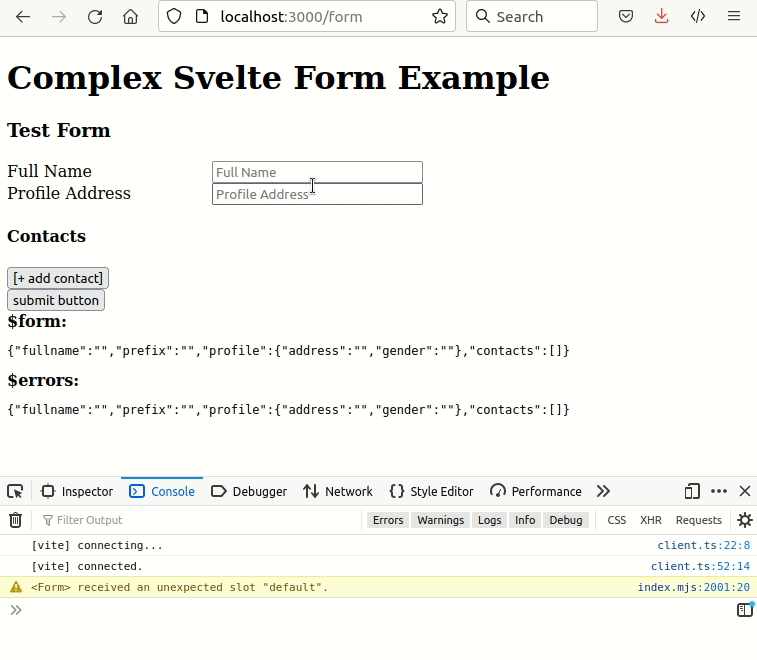
The importance of the name=”” attribute matching the bound js object
We must keep in mind that the HTML form and the $form store is a more “flat” key/value pair data structure, whereas the object is it bound to is a dynamic javascript object, which can easily model hierarchical objects and arrays. This means the way we assign an <input name=””> needs to match the object. Otherwise, our form elements will modify the wrong sections of the object. I had a lot of trouble with this until i figured it out.
The <input> maps by the name=”” attribute, or the id=”” attribute if there is no name. The name/id attribute will be the key in the $form svelte store observable, as well as the matching $errors store.
Examples of the 2-way binding between form and objects:
I try to keep the naming as clear as possible.
| form | object |
|---|---|
| <input name=”fullname” bind:value={$form.fullname} /> | $form.fullname |
| <input name=”profile.address” bind:value={$form.profile.address} /> | $form.profile.address |
| <input name=”contacts[0].name” bind:value={$form.contacts[0].name} /> | $form.contacts[0].name |
| {#each $form.contacts as c, x} <input name={`contacts[${x}].name`} bind:value={$form.contacts[x].name} /> {/each} | $form.contacts[x].name |
| {#each $form.contacts as c, x} {#each contactTypes as ct, y} <label> <input type=”radio” name={`contacts[${x}].contacttype`} value={ct} /> {ct} </label> {/each} {/each} | $form.contacts[x].contacttype |
It can get a little complicated on the html form side, but i like it clear on the javascript side. Theoretically, the HTML could be wrapped into a svelte component to make the syntax cleaner. Let’s leave that to another day.
Adding in validation using ‘yup’
yup is a form validation library, inspired by Eran Hammer‘s joi.
It seems real simple.
- npm i yup
- import * as yup from ‘yup’;
- define your schema declaratively
- set it as the validationSchema in the svelte-forms-lib createForm
- throw in the html $errors next to the form fields, for a visual feedback on invalid data
The validation will run at <form on:submit={handleSubmit}> by svelte-forms-lib, and optionally at the input form element level if you add the on:change={handleChange} and/or on:blur={handleChange} svelte attributes.
Add in a validator schema:
    const validator = yup.object().shape({
        fullname: yup.string().required(),
        prefix: yup.string(),
        profile: yup.object().shape({
            address: yup
                .string()
                .required(),
            gender: yup
                .string()
        }),
        contacts: yup.array().of(
            yup.object().shape({
                contacttype: yup.string(),
                name: yup.string().required(),
                email: yup.string(),
            })
        )
    });
adding a validationSchema property to formProps:
const formProps = {
    ...
    validationSchema: validator,
    ...
}
then adding the error/validation messages near the fields:
{#if $errors.fullname}
	<div class="error-text">{$errors.fullname}</div>
{/if}
and for the deeply-nested fields, i found they often have missing property errors, so i’m using the new javascript optional chaining operator ?.
{#if $errors?.contacts[j]?.name}
  <div class="error-text">{$errors.contacts[j].name}</div>
{/if}
Now we’ve got this working:
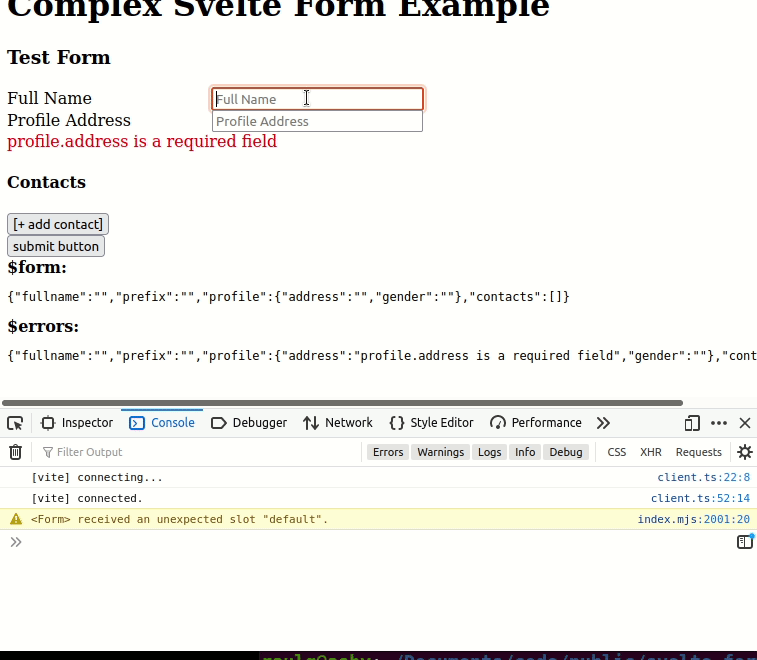
Note that onSubmit() doesn’t fire until all the forms pass yup validation.
Handling radio buttons and checkboxes
Radio buttons and checkboxes require special handling. At first i thought i had to wire up my own idiom between svelte-forms-lib and svelte bind:group handler, but it turns out not to be the case.
Sometimes a radio, checkbox, or select drop down will have a list of simple values. In other cases, there could be complex values, in the cases where a list of items is pulled from a databases. There could be a product_id to store, but a product_name to display. I’m going to try examples of each.
The simple examples will be prefixes and genderOptions. We defined them as simple arrays:
const prefixOptions = ['Ms.', 'Mr.', 'Dr.'];
const genderOptions = ['F', 'M', 'X'];
const contactTypes = ['friend', 'family', 'aquaintence'];
The complex example:
    const products = [
        { product_id: 101, product_name: "Boots", },
        { product_id: 202, product_name: "Shoes", },
        { product_id: 333, product_name: "Jeans", },
    ];
For ‘prefix’, we have a similar label, but instead of one <input>, we get one for each option. So we loop thru the options using an {#each} loop, being careful to:
- set all name=”” attributes to the same input name
- set the value=”” to the actual value to store in the variable
- use the on:change={handleChange} handler
<div>
	<label for="prefix"> Prefix </label>
	{#each prefixOptions as pre, i}
		<label class="compact">
			<input id={`prefix-${pre}`}
			name="prefix"
			value={pre}
			type="radio"
			on:change={handleChange}
			on:blur={handleChange}
			/>
		<span> {pre} </span>
		</label>
	{/each}
	{#if $errors.prefix}
		<div class="error-text">{$errors.prefix}</div>
	{/if}
</div>
For $form.profile.gender, it is almost identical, but the naming must follow one level deeper:
<div>
	<label for="profile.gender"> Profile Gender</label>
	{#each genderOptions as g, i}
		<label class="compact">
			<input id={`prefix-${g}`}
			name="profile.gender"
			value={g}
			type="radio"
			on:change={handleChange}
			on:blur={handleChange}
			/>
		<span> {g} </span>
		</label>
	{/each}
	{#if $errors.profile?.gender}
		<div class="error-text">{$errors.profile.gender}</div>
	{/if}
</div>
And with Contact Type, we need to include the array indexer in the name=”” attribute, so we don’t stomp on values from other array items. It is already inside another {#each} loop, iterating over $form.contacts
<div>
    <label for={`contacts[${j}].contacttype`}>Contact Type</label>
    {#each contactTypes as ct, i}
        <label class="compact">
            <input
            type="radio"
            id={`contacts[${j}].contacttype-${ct}`}
            name={`contacts[${j}].contacttype`}
            value={ct}
            on:change={handleChange}
            on:blur={handleChange}
            />
        <span> {ct} </span>
        </label>
    {/each}
    {#if $errors.contacts[j]?.contacttype}
        <div class="error-text">{$errors.contacts[j].contacttype}</div>
    {/if}
</div>
Finally, let’s combine the array radio with a complex list of items: the ID will be the value, but the display will be a name or description
<div>
	<label for={`contacts[${j}].product_id`}>Product</label>
	{#each products as p, i}
		<label class="compact">
			<input
			type="radio"
			id={`contacts[${j}].product_id-${p.product_id}`}
			name={`contacts[${j}].product_id`}
			value={p.product_id}
			on:change={handleChange}
			on:blur={handleChange}
			/>
		<span> {p.product_name} [{p.product_id}]</span>
		</label>
	{/each}
	{#if $errors.contacts[j]?.product_id}
		<div class="error-text">{$errors.contacts[j].product_id}</div>
	{/if}
</div>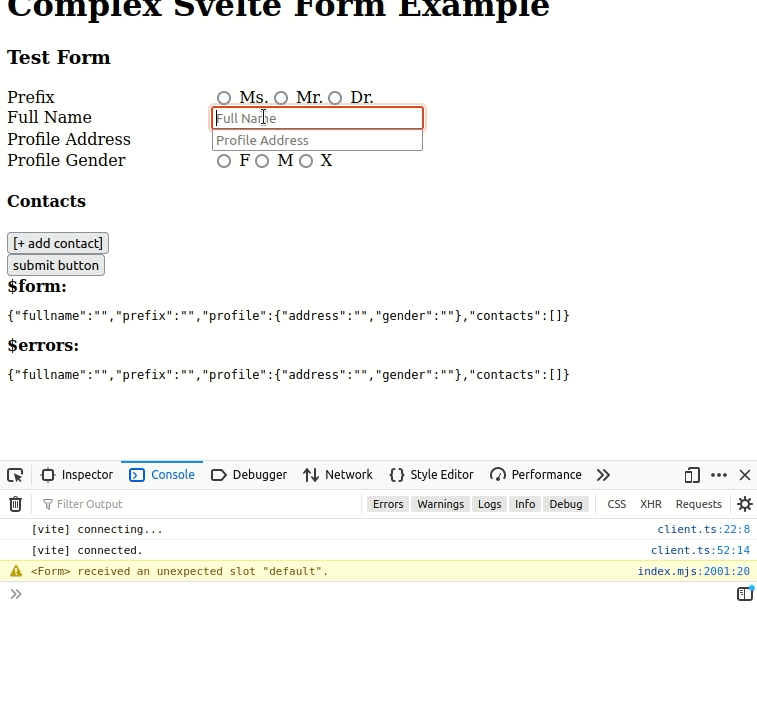
Conclusion
My takeaway is that based on this test of more complex form building and validation using svelte, i’m now confident i could build larger web apps the way i expect — with validation and dynamic forms, including arrays.
I’d like to improve and refactor the examples into components— either the ones provided, or making my own.
References
https://svelte-forms-lib-sapper-docs.vercel.app/array
Nefe James – Top form validation libraries in Svelte
Source code at github
https://github.com/nohea/enehana-complex-svelte-form part 1