Continuous Deployment goes a step further than Continuous Integration, but based on the same principle: the more painless the deployment process is, the more often you will do it, leading to faster development in smaller, manageable chunks.
As a C#/ASP.NET developer deploying to an IIS server, the go-to tool from Microsoft is MSDeploy (aka WebDeploy). This article primarily discusses steps in Visual Studio 2010, Web Deploy 2.0, and TeamCity 7.1. I have read numerous articles which explain using Git w/TeamCity and MSBuild, but not so much specifically with MSDeploy.
My ideal setup is to have the CI server automate all the steps which would otherwise be done manually by the developer. I am using the TeamCity 7 continuous integration server. You can mix/match your own tools, but the basic steps would be the same:
- Edit your VS web project “Package/Publish” settings
- New code changes are committed to source control branch (in my case, Git)
- TeamCity build configuration triggers builds from VCS repository (Git) when new commits are pushed up
- Build step: MSBuild builds code from .csproj, .sln or .msbuild xml file
- Build step: Run unit tests (xUnit.net or other)
- Build step: MSBuild packages code to ZIP file
- Build step: MSDeploy deploys ZIP package to remote server (development or production)
I’ll go thru the steps in detail (except test running, which is important, but a separate focus).
Step 1: edit the Visual Studio project properties
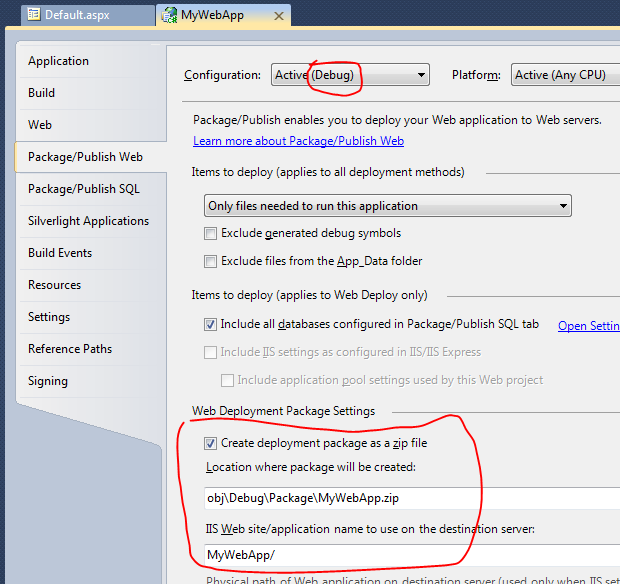
When deploying, there are some important settings in the project which affect deployment. To see them, in your solution explorer, right-click (project name) -> Properties… , tab “Package/Publish Web” …
- Configuration: Active (Debug) – this means the ‘Debug’ config is active in VS, and you are editing it. The ‘Debug’ and ‘Release’ configurations both can be selected and independently edited.
- Web Deployment Package Settings – check “Create deployment package as zip file”. We want the ZIP file so it can be deployed separately later.
- IIS Web Site/application name – This must match the IIS Web site entry on the target server. Note i use “MyWebApp/” with no app name after the path. That is how it looks on the web server config.
Save it with your project, and make sure your changes are checked into Git (pushed to origin/master). Those settings will be pulled from version control when the CI server runs the build steps.
Step 2: add a Build Step in the TeamCity config
I edit the Build Steps, and add a second build step, to build the MyWebApp.sln directly, using msbuild.
MSBuild
Build file path: MyWebApp/MyWebApp.sln
Targets: Build
Command line parameters: /verbosity:diagnostic
Step 3: fix build error by installing Microsoft Visual Studio 2010 Shell (Integrated) Redistributable Package
My first build after adding the web project did fail. Here’s the error:
C:\TeamCity\buildAgent\work\be5c9bc707460fdf\MyWebApp\MyWebApp\MyWebApp.csproj(727, 3): error MSB4019: The imported project “C:\Program Files (x86)\MSBuild\Microsoft\VisualStudio\v10.0\WebApplications\Microsoft.WebApplication.targets” was not found. Confirm that the path in the <Import> declaration is correct, and that the file exists on disk.
I did a little research, and found this link:
Basically, either we need to install VS on the build server, manually copy files, or install the Microsoft Visual Studio 2010 Shell (Integrated) Redistributable Package. I’m going to try door #3.
Step 4: Install the Microsoft Visual Studio 2010 Shell (Integrated) Redistributable Package
After installing the Microsoft Visual Studio 2010 Shell (Integrated) Redistributable Package on the build server, i go back in TeamCity and click the [Run…] button, which will force a new build. I have to do this because nothing changed in the Git source repository (i only installed new stuff on the server), so that won’t trigger a build.
Luckily, that satisfied the Web App build– success!
Looking in the build log, i do see it built MyWebApp.sln and MyWebApp.dll.
So build is good. Still no deployment to a server yet.
Step 5: Install the MS Web Deployment tool
FYI, i’m following some hints from:
- http://www.geekytidbits.com/web-deploy-ms-deploy-from-teamcity/
- http://www.troyhunt.com/2010/11/you-deploying-it-wrong-teamcity_26.html
I get the Web Deployment Tool here and install. After reboot, the TeamCity login has a 404 error. Turns out Web Deploy has a service which listens on port 80, but so does TeamCity Tomcat server. For short term, i stop the Web Deploy web service in control panel, and start the TeamCity web service. The purpose of the Web Deployment Agent Service is to accept requests to that server from other servers. We don’t need that, because the TeamCity server will act as a client, and deploy out to other web servers.
The Web Deployment Tool also has to be installed on the target web server. I’m not going to go too far into detail here, but you have to configure the service to listen as well, so when you run the deployment command, it accepts it and installs on the server. For the development server, i set up a new account named ‘webdeploy’ with permission to install. For production web servers, i’m not enabling it yet, but i did install Web Deploy so i can do a manual run on the server using Remote Desktop (will explain later).
Step 6: Create a MSBuild command to package the Web project
http://www.troyhunt.com/2010/11/you-deploying-it-wrong-teamcity_24.html
In that post, the example “build-it-all” command is this:
msbuild Web.csproj
  /P:Configuration=Deploy-Dev
  /P:DeployOnBuild=True
  /P:DeployTarget=MSDeployPublish
  /P:MsDeployServiceUrl=https://AutoDeploy:8172/MsDeploy.axd
  /P:AllowUntrustedCertificate=True
  /P:MSDeployPublishMethod=WMSvc
  /P:CreatePackageOnPublish=True
  /P:UserName=AutoDeploy\Administrator
  /P:Password=Passw0rd
This is a package and deploy in one step. However, i opted for a different path – separate steps for packaging and deployment. This will allow cases for building a Release package but manually deploying it.
So in our case, we’ll need to do the following:
- Try using the “Debug” config. That will use our dev server web.config settings. XML transformations in Web.Debug.config get applied to Web.config during the MSBuild packaging (just as if you ran ‘Publish’ in Visual Studio).
This is the msbuild package command:
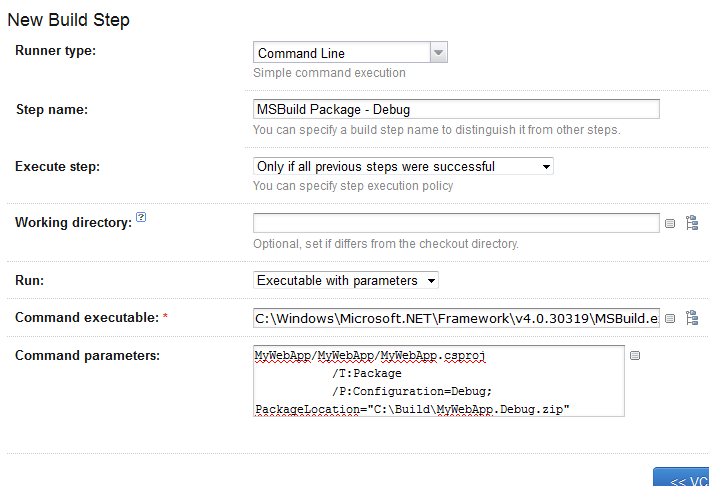
"C:\Windows\Microsoft.NET\Framework\v4.0.30319\MSBuild.exe"
           MyWebApp/MyWebApp/MyWebApp.csproj
           /T:Package
           /P:Configuration=Debug;PackageLocation="C:\Build\MyWebApp.Debug.zip"
Let me explain the command parts:
- MyWebApp.csproj : path to VS project file to build. There are important options in there which get set from the project Properties tabs.
- /T:Package : create a ZIP package
- /P:Configuration=Debug;PackageLocation=*** : run the Debug configuration. This is the same as Build in Visual Studio with the ‘Debug’ setting selected. The ‘Package Location’ is what it created. We will reference the package file later in the deployment command.
I tested this command running on my local PC first. When it was working, i ran the same on the CI server via Remote Desktop (for me, it’s a remote Windows 7 instance).
Step 7: Create a Web Deploy command to deploy the project
- MsDeployServiceUrl – we’ll have to configure the development web server with Web Deploy service.
- Set up user account to connect as (deployuser)
- Have a complete working MSbuild.exe command which works on the command line
- Put the MSBuild command into a new “Deploy” step in TeamCity
After a lot of testing, i got a good command, which is here:
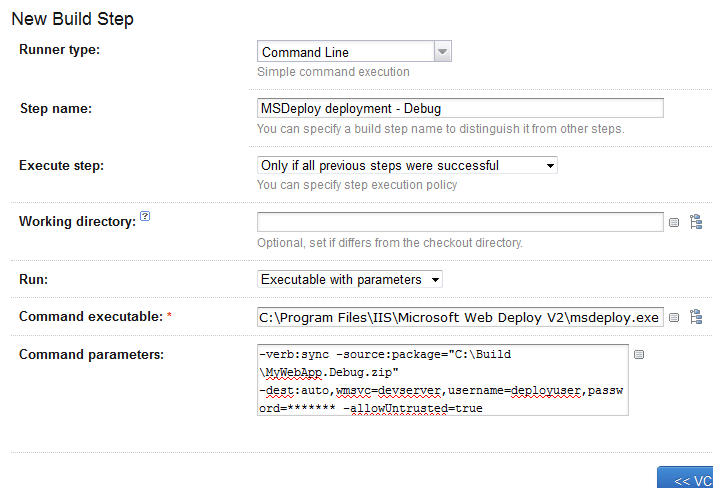
"C:\Program Files\IIS\Microsoft Web Deploy V2\msdeploy.exe" -verb:sync
     -source:package="C:\Build\MyWebApp.Debug.zip"
     -dest:auto,wmsvc=devserver,username=deployuser,password=*******
     -allowUntrusted=true
This command is also worth explaining in detail:
- -verb:sync : makes the web site sync from the source to the destination
- -source:package=”C:\Build\MyWebApp.Debug.zip” : source is an MSBuild zip file package
- -dest:auto,wmsvc=devserver : use the settings in the package file to deploy to the server. The user account is an OS-level account with permission (i tried IIS users, but didn’t get it working). The hostname is specified, but not the IIS web site name (which is previously specified in the MSBuild project file in the project properties).
After deployment, i checked the IIS web server files, to make sure they had the latest DLLs and web.config file.
Step 8: Package and Deploy from the TeamCity build steps
Since we now have 2 good commands, we have to add them to the build steps:
MSBuild – Package step
Note – there is a special TeamCity MSBuild option, but i went with the command-line runner, just because i already had it set.
MSDeploy – Deploy step
In this case, i had to use the command-line runner, since there is no MSDeploy option.
When you run the build with these steps, if they succeed, we finally have automatic deployment directly from git!
You can review the logs in TeamCity interface after a build/deployment, to verify everything is as expected. If there are errors, those are also in the logs.
Now every time new code gets merged and pushed to git origin/master branch, it will automatically build and deploy the the development server. Another benefit is that the installed .NET assemblies will have version numbers which match the TeamCity build number, is you use the AssemblyInfo.cs patcher feature.
It will dramatically reduce the time needed to deploy to development – just check in your code, and it will build/deploy in a few minutes.


Update: in VS 2012, the part of the deployment tab for “IIS Web Site/Application name” is no longer available for edit. However, if it is still in your .csproj file, MSdeploy.exe will still use it.
Look for the section like this:
<DeployIisAppPath>Default Web Site/</DeployIisAppPath>Another way to set it is on the msbuild command line parameter DeployIisAppPath, (see
Visual Studio TFS 2012 and Web Deployment Packages
by Johann Blais )