
This is a short and sweet example of using a SvelteKit frontend project with Nhost authentication.
Overview
Nhost is the serverless backend built on Hasura (graphql server backend). NHost is built on it’s open source Hasura Auth library (using JWTs). They are nearing v2 official release and have sample templates for React and Next.js, but not Svelte yet, so i thought i’d show a simple implementation.

I went through the rationale for using Svelte and Hasura in a prior post. As for why to use Nhost, i see some big pluses:
- Open Source 100%: it is possible to self-host the entire system if you want to leave the provider for any reason. This is big for me.
- Integrated with and built on Hasura: I already decided on using Hasura for it’s role-based authorization, low-code model on top of real relational dbs like PostgreSQL.
- Fills needed gaps in Hasura: authentication and storage.
To demonstrate, i’m going to rely on a few things in Svelte and Nhost, which can hook up nicely:
- Svelte writable() store to observe changes in the authentication status and logged in user, and re-render UX component changes in real-time.
- Nhost auth’s onAuthStateChanged() event handler, which will update the writable() stores whenever a user is logged in or out, or their token expires.
Combining an auth state change handler with an Observable Svelte store linked to a UI component – will ensure authentication always is in sync with the user interface, using the least friction in the code. Less bloat == less bugs.
Those are the main things. I’ll also implement a SvelteKit layout, couple pages to route, a login form / logout button, and “login status box” component which can be included in various places on the app. Plus a Vite .env file, just because its the SvelteKit way and Vite rocks super fast (transpilers to ES5 need to die). I may use TypeScript, but Javascript works just as well (except for the bug in my event handler which i didn’t find until using TS 😡).
Create Nhost Project
Nhost.io is a backend as a service provider, built using Hasura plus Nhost’s own open source Hasura Auth and storage (AWS style). They have a CLI for running locally on your dev machine in a container, but for this demonstration, i will just create a new free service.
Once you have a login registered (Github login supported),
- create or select a workspace
- create a new App (select region, and free plan)
Once the app is deployed, you can copy the Nhost backend url ( https://{long-identifier}.nhost.run ), which you will need to access in your project’s .env file. Also available are tabs for:
- Hasura Console (w/admin secret)
- User Management (a simply UI for managing user records, which your app will use)
- Storage (for any future file storage your app uses)
Typically, your application will access resources with these users. When you design your app, you will configure roles for authorization to your Hasura resources, and the Nhost user roles will also map to the same roles.
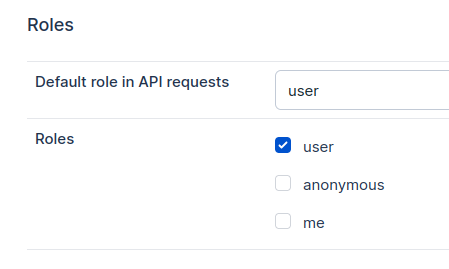
Typically, the anonymous role is “anonymous” or “public”. It’s configurable.
In my opinion, the role authorization system is a major plus of this backend stack. Since they use JWTs, it can scale out to multiple Hasura instances and even other backends, as long as they support JSON Web Tokens and are configured with a shared secret. And Hasura’s row-level authorization has the potential to cut out tons of boilerplate code for authorization.
Create SvelteKit Project

Next, let’s create a SvelteKit project with __layout.svelte and a couple pages.
npm init svelte nhost-sveltekit-auth-test
cd nhost-sveltekit-auth-test
code .
We’re going to have an index page, login page (which will later switch between a login form and a logout function, depending on status), and the layout page will contain a simple navigation, as well as a little component.
Plus a dotenv file, Vite-style.
# .env
VITE_NHOST_BACKEND_URL=https://{long-identifier}.nhost.run
<!-- src/routes/index.svelte -->
<h1>Nhost on SvelteKit</h1>
<p>
Testing Nhost hasura-auth, onAuthStateChanged event with svelte store.
</p>
<p>
Go to <a href="/login">Login Page</a>
</p><!-- src/routes/__layout.svelte -->
<script>
import LoginStatusBox from '$lib/components/LoginStatusBox.svelte';
</script>
<LoginStatusBox />
<div>
<h1>Nhost Hasura Auth + SvelteKit</h1>
<main>
<slot />
</main>
</div>
<div>
<section class="nav">
<ul>
<li><a href="/">Home</a></li>
<li><a href="/login">Login</a></li>
</ul>
</section>
</div>npm install nhost
npm install @nhost/nhost-jsCreate $lib/nhost.ts|.js
// nhost client

import { NhostClient, type NhostClientConstructorParams } from "@nhost/nhost-js";
import { writable } from "svelte/store";

export const VITE_NHOST_BACKEND_URL = import.meta.env.VITE_NHOST_BACKEND_URL as string;

export const config: NhostClientConstructorParams = {
    backendUrl: VITE_NHOST_BACKEND_URL,
};

export const nhost = new NhostClient(config);

// store
export const isSignedIn = writable(null);
export const user = writable(null);

nhost.auth.onAuthStateChanged(
    (event, session) => {
        console.log(`auth state changed. State is now ${event} with session: `, session);
        if (event === 'SIGNED_IN') {
            isSignedIn.set(true);
            user.set(session?.user);
        }
        else {
            isSignedIn.set(false);
            user.set(null);
        }
    }
);

export async function signIn(parameters) {
    // console.log("signIn(parameters): ", parameters);

    let params = {
        email: parameters.email,
        password: parameters.password,
    };

    if (parameters.email) {
        params.email = parameters.email;
    }
    if (parameters.password) {
        params.password = parameters.password;
    }

    // TODO: sanitize inputs

    const data = await nhost.auth.signIn(params);

    return {
        ...data,
    };
}
nhost.auth.onAuthStateChanged() handler
By leveraging Nhost’s onAuthStateChanged() event handler, every time there is an authentication change (signin, signout, for any reason like user-initiated or token expriation), we update the svelte stores/observables with the updated values. In turn, all the components can immediately re-render to update based on the new state. That includes both the login form, as well as the status box component, appearing all over the application. With very little code involved.
Create a login.svelte page and wire it up
<!-- src/routes/login.svelte -->
<script>
    import { isSignedIn, nhost, signIn, user } from '$lib/nhost';

    let loginMessage = '';

    async function loginFormSubmit(e) {
		console.log('loginFormSubmit()');
		const formData = new FormData(e.target);
		const submitData = {};
		for (let field of formData) {
			const [key, value] = field;
			submitData[key] = value;
		}
		console.log("submitData: ", submitData);
		const data = await signIn(submitData);
		console.log(data);
        if(data.error) {
            loginMessage = data.error.message;
        }
        else {
            loginMessage = "login success";
        }
	}

</script>

login

<div style="color:red">
    {loginMessage}
</div>

{#if $isSignedIn && $user}
    <div>you are signed in, {$user.displayName}</div>
    <div><a href="#signout" on:click={()=> nhost.auth.signOut()}>sign out</a></div>
{:else if $isSignedIn === false}
    <div>please log in</div>

    <form on:submit|preventDefault={loginFormSubmit}>
        <div class="form-item-wrapper">
			<label for="email" class="form-label">Email</label>
			<input name="email" type="text" placeholder="Email" class="form-field" />
		</div>
		<div class="form-item-wrapper">
			<label for="password" class="form-label">Password</label>
			<input name="password" type="password" placeholder="Password" class="form-field" />
		</div>

		<input type="submit" value="Log In" />
    </form>

{:else}
    <div>Page loading...</div>
{/if}
Create a “login status box” for display on navigation or other places all around the site/app
<!-- src/lib/components/LoginStatusBox.svelte -->
<script>
import { isSignedIn, user } from "$lib/nhost";
</script>

<div class="loginstatus">

{#if $isSignedIn && $user}
<div>Aloha {$user.displayName}</div>
{:else}
<a href="/login">Login</a>
{/if}

</div>

<style>
    .loginstatus {
        border-style: dotted;
        border-color: gray;
        display: flex;
        width: fit-content;
    }
</style>
Conclusions
What i found:
- Implementing Nhost’s Hasura Auth is relatively simple
- Its onAuthStateChanged() handler can map easily to a Svelte store for reactive UX.
Source code on github: https://github.com/nohea/enehana-nhost-sveltekit-auth
This coding video is on YouTube:
References
- Nhost https://nhost.io
- Svelte https://svelte.dev
- SvelteKit and Supabase Tutorial with Authentication – Build a SvelteKit App Part 2 https://www.youtube.com/watch?v=YqIyET7XKIQ
Extra Credit
I found there is a token change event handler onTokenChanged() , which can be used to update any JWT store observable you may use.
hello! do you know how integrate the Oauth authentication? also, has you tried the nhost authentication server which is opensource? thank you
To integrate oauth login (like github, google, etc) you have to create the ‘app’ on those particular providers. I haven’t done it, but i looked at it.
As for self-hosting Nhost authentication server open source, i haven’t tried it but it is all there when you run the nhost cli for local testing (runs in docker). I feel good about future-proofing my auth, either i would self-host Nhost or else i could easily port to another JWT-based auth like Google Firebase or Auth0.