Author Archives: raulg

Using Handlebars.js templates as precompiled JS files

I’ve previously used Handlebars templates in projects, but only in the simple ways– i defined a <script> block as inline html templates, and used in my js code.

However, i have a project where i need all the code, including html templates, as js files.
Luckily Handlebars can do this, but we’ll need to set up the proper node-based build environment to do so.

  • node.js
  • gulp task runner
  • bower for flat package management
  • handlebars for templates

The templates will get “precompiled” by gulp, resulting in a pure js file to include in the html page. Then we’ll be able to code in HTML, but deploy as JS.

First i create a new empty ASP.NET Web project in Visual Studio. I’ll call it: HandlebarsTest. Note that almost none of this is Visual Studio-specific, so 95% is applicable to any other development environment.

Next, i will set up Gulp and Bower, similar to how i did it in my 2 prior posts:

I will create the gulpfile.js like so (we’ll add it it):

var gulp = require('gulp');

gulp.task('default', ['scripts'], function() {

});

gulp.task('scripts', function() {
});

Open the node command prompt, and change to the new directory

cd HandlebarsTest\HandlebarsTest
npm init
npm install -g gulp
npm install gulp --save-dev
npm install gulp-uglify --save-dev
npm install gulp-concat --save-dev
npm install gulp-wrap --save-dev
npm install gulp-declare --save-dev

I will create the .bowerrc file like so:

{
    "directory": "js/lib"
}

OK, now for some handlebars stuff. One thing to understand is we need to do handlebars stuff at build/compile time AND at runtime. That means:

  • the precompilation will be run by gulp during build time (install gulp-handlebars using npm), and
  • the web browser will execute the templates with the handlebars-runtime library (install to the project using Bower)
npm install gulp-handlebars --global
npm install gulp-handlebars --save-dev

Bower (client-side) packages

I will use Bower to install the client side libs: handlebars, jquery, etc. First, create the bower.json file.

bower init

Next, start installing!

bower install jquery
bower install handlebars

Those files get installed to /js/lib/* , per my .bowerrc file. Now we can reference them in scripts, or use them for js bundles.

HTML, Javascript, and Handlebars templates together.

My use-case is to:

  1. Have a static HTML page
  2. Include a script tag which loads a single JS file
  3. The single JS file will load/contain the libraries AND the main execution code
  4. the main execution code will render a DIV element which renders a Handlebars template with an object.

HTML page just includes a single JS , which will be built:

<!DOCTYPE html>
<html xmlns="http://www.w3.org/1999/xhtml">
<head>
    <title>Handlebars Test</title>
    <script type="text/javascript">
    (function() {
        function async_load(){
            var cb = 'cb=' +(new Date).getTime();

            var rmist = document.createElement('script');
            rmist.type = 'text/javascript';
            rmist.async = true;
            rmist.src = '../js/dist/bundle.js?' + cb;
            var x = document.getElementsByTagName('script')[0];
            x.parentNode.insertBefore(rmist, x);
        }
        if (window.attachEvent)
            window.attachEvent('onload', async_load);
        else
            window.addEventListener('load', async_load, false);
    }());
    </script>
</head>
<body>

    <h1>Handlebars Test</h1>

    <p id="main-content">
        There will be a dynamic element added after this paragraph.
    </p>
    <p id="dynamic-content"></p>

</body>
</html>

Handlebars templates will be in /templates/*.hbs . Here’s an example, i’m calling /templates/hellotemplate.hbs:

<div class="hello" style="border: 1px solid red;">
    <h1>{{title}}</h1>
    <div class="body">
        Hello, {{name}}! I'm a template. 
    </div>
</div>

Javascript will be in the /js/app/app.js and the other libraries

Here, i’m taking direction from https://github.com/wycats/handlebars.js#precompiling-templates

gulp-handlebars handles the precompilation. We will run the ‘gulp’ build process to precompile hbs templates to js later.

The app.js code will need to render the precompiled template with the data object, and add to the DOM somehow (using jQuery in this case).

"use strict";
var data = { title: 'This Form', name: 'Joey' };
var html = MyApp.templates.hellotemplate(data);
// console.log(html);

$(document).ready(function () {
    $('#dynamic-content').html(html);
});

Precompiling the templates and using them

I will modify the gulpfile.js to add a task for template compilation. This is my final version:

var gulp = require('gulp');
var uglify = require('gulp-uglify');
var concat = require('gulp-concat');

gulp.task('default', ['templates','scripts'], function () {

});

var handlebars = require('gulp-handlebars');
var wrap = require('gulp-wrap');
var declare = require('gulp-declare');
var concat = require('gulp-concat');

gulp.task('templates', function () {
    gulp.src('templates/*.hbs')
      .pipe(handlebars())
      .pipe(wrap('Handlebars.template(<%= contents %>)'))
      .pipe(declare({
          namespace: 'MyApp.templates',
          noRedeclare: true, // Avoid duplicate declarations
      }))
      .pipe(concat('templates.js'))
      .pipe(gulp.dest('js/dist'));
});

gulp.task('scripts', function () {
    return gulp.src(['js/lib/jquery/dist/jquery.js', 'js/lib/handlebars/handlebars.runtime.js', 'js/dist/templates.js', 'js/app/**/*.js'])
      .pipe(concat('bundle.js'))
      .pipe(uglify())
      .pipe(gulp.dest('js/dist/'));
});

The key section is the ‘templates’ task. Translating:

  • read all *.hbs templates
  • process thru handlebars() precomilation
  • setting the namespace MyApp.templates
  • output to a single JS file js/dist/templates.js

The scripts task combines all the JS files to one bundle.js. However, i had some trouble debugging the code, so i first ran the JS without a bundle. I changed the html to use traditional javascript references instead of the bundle.js:

<head>
    <title>Handlebars Test</title>
    <script src="../js/lib/jquery/dist/jquery.min.js"></script>
    <script src="../js/lib/handlebars/handlebars.runtime.min.js"></script>
    <script src="../js/dist/templates.js"></script>
    <script src="../js/app/app.js"></script>
</head>

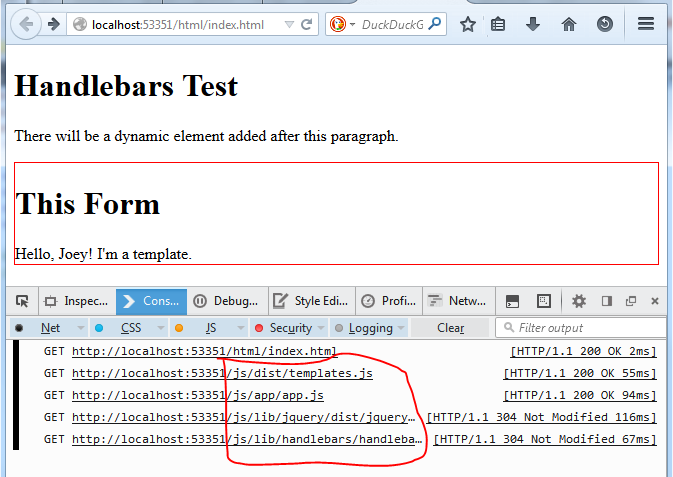
The load order is important– libraries, then templates, then the main app code. After fixing bugs, i get the desired HTML output in page:

handlebars-test-html-nobundle

Note the multiple GET requests. But it functionally is working.

Run the bundled version

Now that the JS code runs the templates with jQuery OK, we can remove the multiple script references and switch to the single bundle.js script.

Don’t forget to execute the ‘gulp’ build again (on the command line or via visual studio). Looking at the gulp ‘script’ task, note the order of the bundling concatenation needs to be the same order as the <script> tag includes would be in the above example. Otherwise, things wlil get out of order.

gulp.task('scripts', function () {
    return gulp.src(['js/lib/jquery/dist/jquery.js', 'js/lib/handlebars/handlebars.runtime.js', 'js/dist/templates.js', 'js/app/**/*.js'])
      .pipe(concat('bundle.js'))
      .pipe(uglify())
      .pipe(gulp.dest('js/dist/'));
});

Run the ‘gulp’ task again to build, via the command line or via the VS Task Runner Explorer, or the post-build event (i haven’t yet learned to use ‘watch’ to auto-rebuild). Don’t forget to change the HTML back to load /bundle.js instead of the multiple JS files.

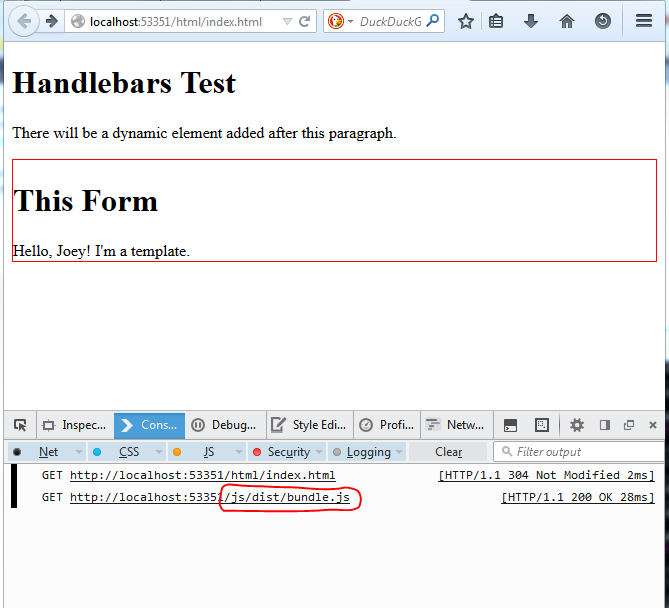
Running/reloading the page, we finally get the precompiled templates inserted into the html page, via the single bundle.js:

handlebars-test-html-bundle

This stuff gets a bit crazy! Why do this? I guess i want to compile, process, and optimize my javascript code.

The project code is here: https://github.com/nohea/Enehana.CodeSamples/tree/master/HandlebarsTest . Without the /node_modules directory, since the file paths are too long for Windows ZIP. To reconstitute the directory, cd to the project folder, and run:

cd HandlebarsTest\HandlebarsTest
npm update

That will reconstitute the packages from the internet, since all the dependencies are listed in the package.json file. It also allows you to easily exclude the node_modules directory from version control, and allow other developers to ‘npm update’ to populate their own directories.

Using Bower for JS package management instead of NPM

This is a follow up to my post: Learning Gulp with Visual Studio – the JavaScript Task Runner

In my last post, i did the following:

  • Created a web project
  • Installed Node.js
  • Installed Gulp for running JS build tasks
  • Installed more JS libraries using NPM (node package manager)
  • Created simple HTML+JS app w/jquery
  • Created gulp tasks to minify and bundle JS into main.js
  • run proof of concept
  • added gulp task to post-build event so it is run automatically

In this post, i will make some changes to the above, in that i will replace the JS package manager NPM with Bower.

Why? NPM works, but has some disadvantages vs. Bower. NPM packages all keep copies of their own dependencies. This can result in multiple versions of libraries, like JQuery, even different versions. Bower uses a ‘flat’ model, so only one version is installed at a time.

Well, what about just using NuGet? That is possible too, but NuGet is not good at updating dependent versions after initial installation. If you install different NuGet packages with the same dependency, the “last one wins”.

To be completly frank, i think it’s kind of crazy to have 2 different JS package managers in the same project. But Bower does solve the problem of having a single “flat” package dependencies. I found some hacks/workarounds to do it in NPM, but i just can’t see making the brain investment unless i do node all day every day.

Installing Bower

Open the Node Command Prompt.

We are going to install it using NPM, globally:

npm install -g bower

At that point, we can install libraries using bower, similar to how NPM works.

You also need to install msysgit , but we already installed it when installing Git Extensions.

Bower uses Git to install packages.

Configuring  / .bowerrc

Packages will install to the bower_components/ directory. If you want to change the defaults, create a .bowerrc directory and set it.

If you want to change that, create a file in your project named .bowerrc and enter the JSON to specify:

{
    "directory": "js/lib"
}

The packages will get installed there instead.

I found trouble creating the file with a leading dot in Windows Explorer or Visual Studio. However, using Notepad, you can save a file with a leading dot.

Installing Gulp to the project, as a development tool

First we create a package.json file for our project.

npm init

We are going to use the Gulp task build tool, but that is not a client-side library. It is used as a development build-time tool, so we are installing it using npm.

npm install gulp --save-dev

We also need to install the gulp-* plugins we need at build time:

npm install gulp-uglify --save-dev
npm install gulp-concat --save-dev

Those commands create entries in your package.json file, under the key devDependencies. That means they can be automatically installed when the project is built on another machine.

Installing client-side packages

The whole point of Bower is to use it for client-side packages like JQuery, Angular, etc.

First, in the node command prompt, we will initialize it by creating a bower.json file. You can do it manually, or do the init command, and fill out the questions.

Here is what i got:

{
  "name": "GulpBowerWebTest",
  "version": "0.0.1",
  "authors": [
    "raulg <raulg@xxxxx.yyy>"
  ],
  "description": "Test using Bower",
  "license": "Proprietary",
  "private": true,
  "ignore": [
    "**/.*",
    "node_modules",
    "bower_components",
    "js/lib",
    "test",
    "tests"
  ]
}

Now i’m going to install some libs, like jquery (specific version 1.9.x).

bower-install-jquery-commandprompt-2014-10-30

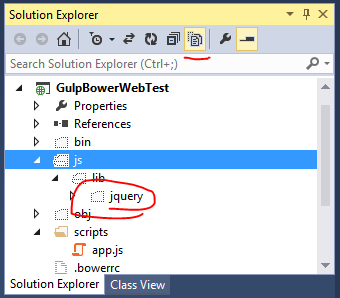
Note in Solution Explorer (w/”Show all Files” on) they installed to /js/lib/, as specified in our .bowerrc

bower-install-jquery-sol-expl-2014-10-30

Updating Gulpfile.js

I copied the static index.html and app.js files from my prior project. I’m using the same Gulpfile.js, with only some updates to the paths, since they are in different locations:

var gulp = require('gulp');
var uglify = require('gulp-uglify');
var concat = require('gulp-concat');

gulp.task('default', ['scripts'], function() {

});

gulp.task('scripts', function() {
    return gulp.src(['js/lib/jquery/jquery.js', 'scripts/**/*.js'])
      .pipe(concat('main.js'))
      .pipe(uglify())
      .pipe(gulp.dest('js/dist/'));
});

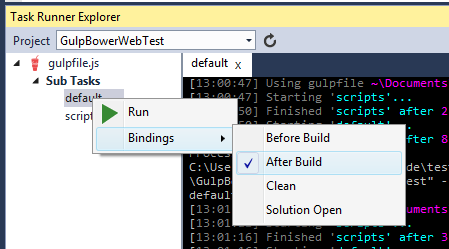
I’m trying out using Task Runner Explorer to run gulp. After tweaking and testing, i’m going to try checking the After Build event. This could be an alternative to setting it in the project’s post-build event. I’m not sure if its better yet, since i’ll need to have it work when building on the TeamCity CI server using MSBuild. Some VS tooling are not supported in MSBuild.

bower-taskrunner-afterbuildevent-2014-10-30

Now when i run the app, it works the same. The differences are that jQuery is at 1.9 version, and it should be easier to manage the client-side JS libs we use, and keep versions up to date and consistent (using the bower update command). I think that means jquery 1.9.x gets the latest, but will not go to 2.x if specified in the bower.json file.

References:


Learning Gulp with Visual Studio – the JavaScript Task Runner

As I start looking into building more high-performance web apps, we are lead into the area of Javascript and CSS bundling and minification. I know my “old-school” Javascript coding, but in recent years, there’s been a huge movement in the JS community regarding the whole toolchain, so i’m jumping in here.

There is a Microsoft ASP.NET way to do bundling now, as well as the ServiceStack Bundler project, which uses node.js . However, that also has some dependency on ASP.NET MVC code.

Since most of the development in this area has been built in the JavaScript / HTML / CSS community, the most mature tools are there. So i’m going to do a documented test of the tools in use. In recent years, i’ve done most web development in Visual Studio w/C#, Javascript, HTML, CSS. But i do have a background in professional Perl web development (years ago), so i have a different perspective. I’m coming at the new front-end JS toolsets from a point of discovery, so this may be most useful if you are also new to it. Don’t treat this as a “how to do it the best way” article.

Grunt is a “JavaScript Task Runner”, which can be thought of as a build tool for JS code. It uses node.js for executing tasks.

Gulp is another JavaScript Task Runner. It is in the same role as Grunt, but works with a JS code function instead of a JSON config. Also, it uses Node Streams instead of temp files, and does not require a ‘plugin’ per library. I was going to write a Grunt how-to, but i changed my mind and will do Gulp.

We want some kind of task runner, since we need to:

  • read all the JS library files and ‘minify’ them to take up the least space possible
  • bundle the files into one JS file, to reduce the number of HTTP requests the client needs to make

Thus, static files will not work. The task runner need to run during design time, and probably build/deploy time as well.

Installing the Toolset

First to install the toolset on Windows, the FAQ has recommended:

  • Installing msysgit (which will be installed if you have my favorite Git Extensions installed)
  • Installing node for windows
  • using Command Prompt or Powershell as a command line (i use command prompt here)

Then we can figure out later how to make it easier to use in Visual Studio and MSBuild.

OK, i installed Node and npm, the Node.js package manager. Think of node of being it’s own platform with its own infrastructure, its own EXE, and its own set of installable packages. NPM is how you install packages.

Installing Grunt (via NPM)

According to the getting started page, we install grunt-cli via NPM.

Run the “Node.js command prompt” as Administrator by right-clicking it in the start menu. Note: this is NOT the green “Node.js” shortcut, which will not work. Then in the prompt, type:

npm install -g grunt-cli

You will see it download and install. But never mind that/skip it, cause i just changed my mind (Javascript fashion changes rapidly – just hang on for the ride, and just make sure you know what problem a tool does before you try to use it). I like the gulpfile code syntax better that the grunt json format, and i heard it builds faster too.

Installing Gulp (via NPM)

Now that i changed my mind, here’s how we can install Gulp via NPM: (from the Getting Started)

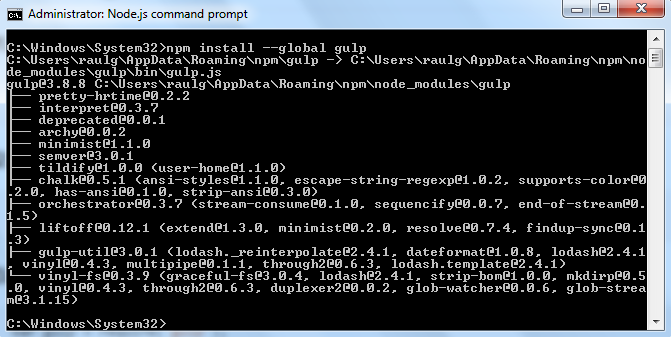
npm install --global gulp

learninggulp-npm-gulp

Seems to have installed some dependent libs i know nothing about. No prob.

This is a global install on your machine. It seems you will also have to install it per project using npm “devDependiencies” with the –save-dev flag. More on that later. Global installs are for command-line utilities. If you are using client-side libs, you install them or require() them in your project.

Creating a New Web Project using Gulp

You can do this with no IDE by creating an empty directory and start there. But since my team uses Visual Studio, i will create an empty ASP.NET web app and install there manually.

In VS 2013, Add New Projects, ASP.NET , name it, and select the “Empty” template. That will create the minimal project.

For kicks, add a static HTML file for testing later. Right-click the project, Add -> HTML page. Call it index.html.

Installing Gulp to the project

In the Node command prompt (doesn’t have to be Administrator mode), cd to your project directory (not the solution directory).

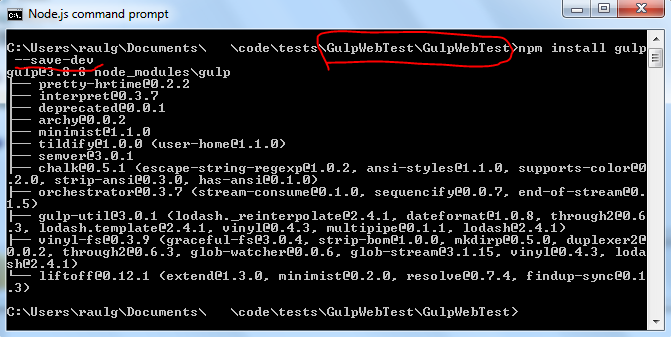
npm install gulp --save-dev

learninggulp-npm-gulp-save-dev

This will install the Node infrastructure to the project as a /node_modules/ directory.

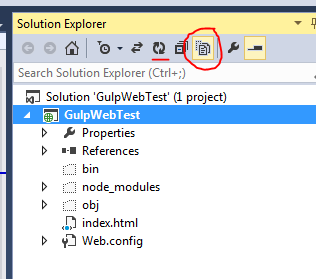
I recommend clicking the “View All Files” button in Solution Explorer and also clicking the “Refresh” button.

learninggulp-solexp-showfiles

This will show you the files not tracked by VS, but in the directory.

Create the minimal gulpfile.js

Right-click the project, and add new text/js file called gulpfile.js . The minimal file will contain:

var gulp = require('gulp');

gulp.task('default', function() {
  // place code for your default task here
});

Now on the command line, you can run the default ‘gulp’ command, which will do nothing.

learninggulp-run-default-task

Installing other JS libraries for use (via NPM)

The point of using a JS build tool is including other JS libraries in your project, for use at build time or run time. So for the sake of proof-of-concept, i will install the uglify lib (for minification), concat to bundle all js scripts, and the JQuery lib (for use in our client-side scripts).

There is a special gulp-uglify plugin (a bunch of others too), so we install that in the same way with npm.

npm install gulp-uglify --save-dev

concat also has a gulp plugin:

npm install gulp-concat --save-dev

I will install the standard JQuery lib as well. Note i can use NPM to install it, or i could have it Microsoft-style and install using NuGet. The only difference would be the path to the *.js files in the project.

npm install jquery --save-dev

jQuery installs to: /node_modules/jquery/dist/jquery.js

Create a primitive “real” app

I’m going to create a /scripts/app.js file which does a simple jQuery DOM manipulation.

// my app
$(document).ready(function () {
    $('#message-area').html("jQuery changed this.");
});

Also, the index.html file will reference/run the app.js and jquery scripts.

<!DOCTYPE html>
<html xmlns="http://www.w3.org/1999/xhtml">
<head>
    <title>Gulp Web Test</title>
    <script src="node_modules/jquery/dist/jquery.min.js"></script>
    <script src="scripts/app.js"></script>
</head>
<body>
    <h1>Gulp Web Test</h1>
    <div id="message-area">Static DIV content.</div>
</body>
</html>

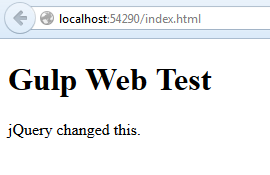
When you execute this traditional, static version of the app, it will run as expected:

learninggulp-jquerychangedthis-static

Starting to put it together

Now we configure the gulp file to run our 3 tasks together:

  1. minify our JS scripts
  2. concat them into one JS file

We need to add this to the gulpfile.js:

var gulp = require('gulp');
var uglify = require('gulp-uglify');
var concat = require('gulp-concat');

gulp.task('default', ['scripts'], function () {

});

gulp.task('scripts', function () {
    return gulp.src(['node_modules/jquery/dist/jquery.js', 'scripts/**/*.js'])
      .pipe(concat('main.js'))
      .pipe(gulp.dest('dist/js'))
      .pipe(uglify())
      .pipe(gulp.dest('dist/js'));
});


Note i’ve created a new ‘scripts’ task, which is added as a dependent task to the ‘default’ task. The ‘scripts’ task is using the jquery.js file and all the *.js files in the /scripts/ directory as sources. They all go thru concat(), output to main.js , in the dist/js/ directory. They then go thru uglify().

Next,we run the ‘gulp’ command on the node command line. After a couple back and forth errors and corrections, we get this:

learninggulp-gulp-cmd-final

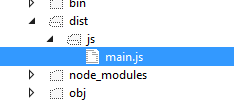
In Solution Explorer, you can refresh and now see the /dist/js/main.js file which was created.

learninggulp-output-main-js

It should contain our custom js code as well as the whole jQuery.

Then we can update the HTML reference to the new output bundle.js file, and see if it runs the same way. Delete the script tags for jquery.js and app.js, and add a single one for main.js

<script src="dist/js/main.js"></script>

When you run the same index.html in the browser, you should get the same “jQuery changed this.” output, even though the only js file is ‘main.js’. The output main.js is only 83K. I’m sure it could get smaller if we use gzip, etc. But it proves the concept works. It should be very easy to add other JS modules as needed.

The downside is installing this stuff to the project added 2,000 files under /node_modules/, adding about 12MB.

Visual Studio and MSBuild Integration

I did find some info on how to run Gulp and Grunt from withing VS as a post-build command, and hopefully in MSBuild as well:

For Gulp, we can just add a post-build step in the project –

  • right-click the project -> Properties…
  • click “Build Events”…
  • to the “Post-build event command-line:” add the following:
cd $(ProjectDir)
gulp

That will run the ‘gulp’ command via VS when you ‘build’, instead of having to use the command line. Much more convenient. You can delete the main.js file, then ‘build’ again – it will regenerate. Reference: Running Grunt from Visual Studio post build event command line
http://stackoverflow.com/questions/17256934/running-grunt-from-visual-studio-post-build-event-command-line .

Possibly much more full-featured and useful is the “Task Runner Explorer” VSIX extension. This is basically “real” tooling support in VS. I haven’t tried it yet, but i expect to try it.

Code for this post can be found here: https://github.com/nohea/Enehana.CodeSamples/tree/master/GulpWebTest

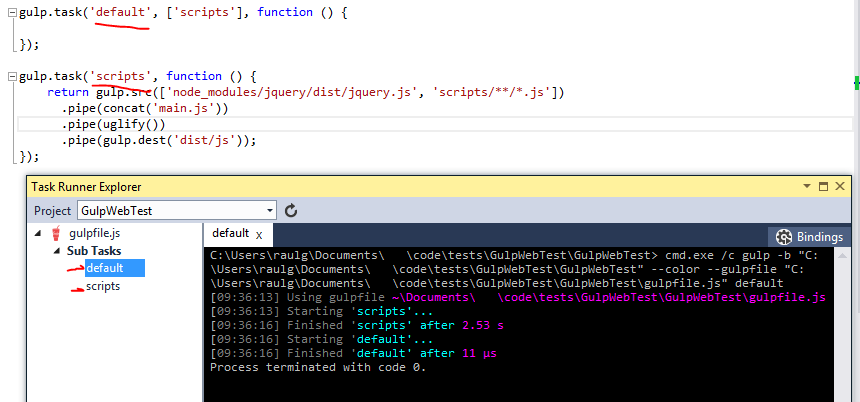
Update: I installed the Task Runner Explorer per the article above. It does work to view/run targets in the Gulpfile.js, so you don’t have to run on the command line, or have to build to execute the tasks.

learninggulp-task-runner-explorer

Update 2: i have a follow-up post: Using Bower for JS package management instead of NPM

Resources


ServiceStack CSV serializer with custom filenames

One of ServiceStack’s benefits is having one service method endpoint output to all supported serializers. The exact same code will output formats for JSON, XML, CSV, and even HTML. If you are motivated, you are also free to add your own.

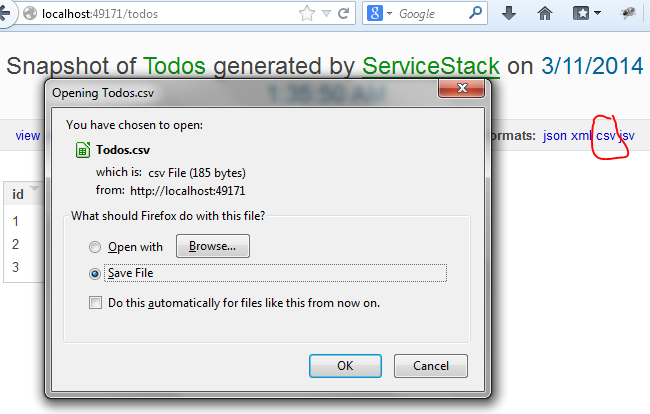
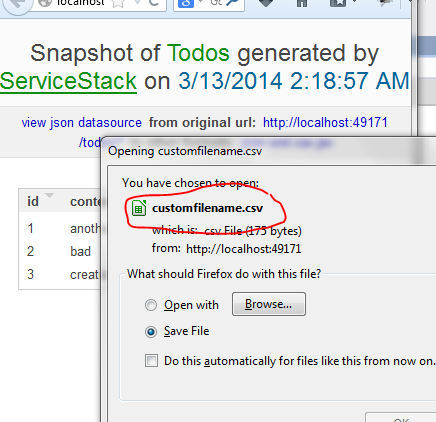
Now in the case of CSV output, the web browser handling the download will prompt the user to save the text/csv stream as a file. The ‘File Save’ dialog will fill in the name of the file, if it is included in the HTTP response this way:

todos-service-opening-dialog

Note the filename is “Todos.csv”, because the request operation name is “Todos”. (i’m using the example service code).

There could be many cases where you would like to have much more fine-grained control of the default filename. However, you don’t want to pollute the Response DTO, since that would ruin the generic “any format” nature of the framework. You’ll probably also want to be able to have different filename-creation logic per-service, since you’ll often have many services in one application.

In my attempt to get to the bottom of this,

  • I create a new blank ASP.NET project. The version i want is the 3.9.* version, since i’m not up on the v4 stuff.
  • Using this site, i can identify the correct version of the NuGet package, and install the correct ones: https://www.nuget.org/packages/ServiceStack.Host.AspNet/3.9.71
  • Then i install from the console.
    PM> Install-Package ServiceStack.Host.AspNet -Version 3.9.71
  • I see all my references are 3.9.71
  • My web.config has the ServiceSTack handlers installed, and my project has the App_Start\AppHost.cs

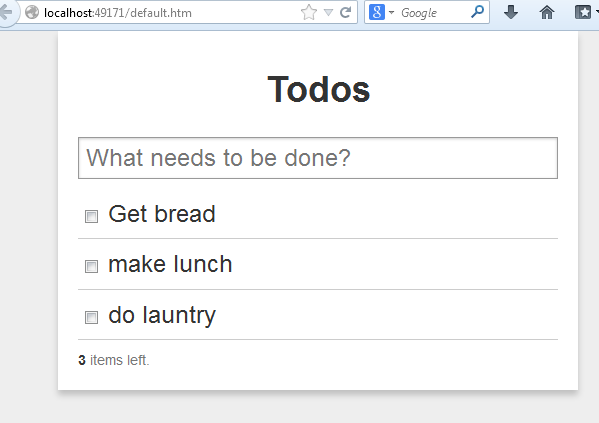
The demo project is the ToDo list. I’ll use it to test the CSV output. First, add a few items:

todos-ux

Then try to get the service ‘raw’:
http://localhost:49171/todos

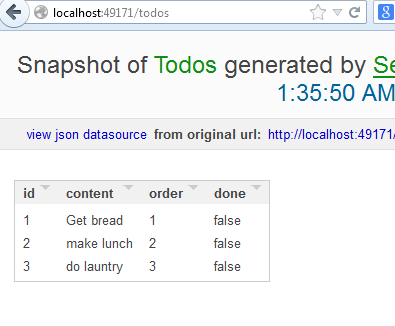
You will see the generic ServiceStack output page:

todos-service-html

Next, click the ‘csv’ link on the top right, in order to get the service with a ‘text/csv’ format. You will get the prompt dialog, as shown at the top of this post, with the ‘Todos.csv’ filename.

if you inspect the HTTP traffic in Fiddler, the request is:

GET /todos?format=csv HTTP/1.1

the response of looks like this:

HTTP/1.1 200 OK
 Cache-Control: private
 Content-Type: text/csv
 Vary: Accept-Encoding
 Server: Microsoft-IIS/8.0
 Content-Disposition: attachment;filename=Todos.csv
 X-Powered-By: ServiceStack/3.971 Win32NT/.NET
 X-AspNet-Version: 4.0.30319
 X-SourceFiles: =?UTF-8?B?QzpcVXNlcnNccmF1bGdcRG9jdW1lbnRzXGVuZWhhbmFcY29kZVxFbmVoYW5hLkNvZGVTYW1wbGVzXFNzQ3N2RmlsZW5hbWVcdG9kb3M=?=
 X-Powered-By: ASP.NET
 Date: Tue, 11 Mar 2014 01:43:52 GMT
 Content-Length: 88
Id,Content,Order,Done
 1,Get bread,1,False
 2,make lunch,2,False
 3,do launtry,3,False

The Content-Disposition: header defines the default filename of the save dialog box.

So how is this set? ServiceStack’s CSV serializer code sets is explicitly.

The best way i’ve discovered to do this is to plug in your own alternative CsvFormat plugin. If you view the source code, you’ll see where it sets the Content-Disposition: header in the HTTP Response.

    //Add a response filter to add a 'Content-Disposition' header so browsers treat it natively as a .csv file
    appHost.ResponseFilters.Add((req, res, dto) =>
    {
	    if (req.ResponseContentType == ContentType.Csv)
	    {
		    res.AddHeader(HttpHeaders.ContentDisposition,
			    string.Format("attachment;filename={0}.csv", req.OperationName));
	    }
    });

The docs for ServiceStack’s CSV Format are clear on it:

https://github.com/ServiceStackV3/ServiceStackV3/wiki/ServiceStack-CSV-Format

A ContentTypeFilter is registered for ‘text/csv’, and it is implemented by ServiceStack.Text.CsvSerializer.

Additionally, a ResponseFilter is added, which adds a Response header. Note the Content-Disposition: header is explicitly using the Request ‘OperationName’ as the filename. Normally this will be the Request DTO, which in this case is named ‘Todos’.

res.AddHeader(HttpHeaders.ContentDisposition, 
        string.Format("attachment;filename={0}.csv", req.OperationName));

So, what if we want to replace the default registration with different logic for setting the filename? We won’t need to change the registered serializer (still want the default CSV), but we should remove the ResponseFilter and add it in a slightly different way.

If you want to remove both, you can remove the Feature.Csv. However, in this case i just want to change the filter. I had trouble altering the response filter directly, so instead i created my own ‘CsvFilenameFormat’, which looks almost exactly like ‘CsvFormat’. The difference is that i try to get a custom filename from the service code, by looking in Request.Items Dictionary<string, object>.

The differing code in CsvFilenameFormat.Register():

    //Add a response filter to add a 'Content-Disposition' header so browsers treat it natively as a .csv file
    appHost.ResponseFilters.Add((req, res, dto) =>
    {
        if (req.ResponseContentType == ContentType.Csv)
        {
            string csvFilename = req.OperationName;

            // look for custom csv-filename set from Service code
            if( req.GetItemStringValue("csv-filename") != default(string) )
            {
                csvFilename= req.GetItemStringValue("csv-filename");
            }

            res.AddHeader(HttpHeaders.ContentDisposition, string.Format("attachment;filename={0}.csv", csvFilename));
        }
    });

So if the service code sets a custom value, it will be used by the text/csv response for the filename. Otherwise, use the default.

In the service:

        public object Get(Todos request)
        {
            // set custom filename logic here, to be read later in the response filter on text/csv response
            this.Request.SetItem("csv-filename", "customfilename");

So the mechanism is set up, all we need to do is properly prevent the default Csv ResponseFilter and use our own instead.

In AppHost Configure(), add a line to remove the Csv plugin, and one to install our replacement:

            // clear 
            this.Plugins.RemoveAll(x => x is CsvFormat);

            // install custom CSV
            Plugins.Add(new CsvFilenameFormat());

At this point, everything is in place, and we can re-run our web app:

todos-service-opening-dialog-customfilename

Project code here.

That’s the show. Thanks.

Customizing IAuthProvider for ServiceStack.net – Step by Step

Introduction

Recently, i started developing my first ServiceStack.net web service. As part of it, i found a need to add authentication to the service. Since my web service is connecting to a legacy application with its own custom user accounts, authentication, and authorization (roles), i decided to use the ServiceStack Auth model, and implement a custom IAuthProvider.

Oh yeah, the target audience for this post:

  • C# / .NET / Mono web developer who is getting started learning how to build a RESTful web api using ServiceStack.net framework
  • Wants to add the web API to an existing application with its own proprietary authentication/authorization logic

I tried to dive in and implement in my app, but i got something wrong with the routing to the /auth/{provider} , so i decided to take a step back and do the simplest thing possible, just so i understood the whole process.That’s what i’m going to do today.

I’m using Visual Studio 2012 Professional, but you could also use VS 2010, probably VS 2012 Express as well (or MonoDevelop, that’s another story i haven’t tried).

The simplest thing possible in my mind:

This is not an example of TDD-style development — more of a technology exploration.

OK, let’s get started.

Creating HelloWorld

I’m not going to repeat what’s already in the standard ServiceStack.net docs, but the summary is:

  • create an “ASP.NET Empty Web Application” (calling mine SSHelloWorldAuth)
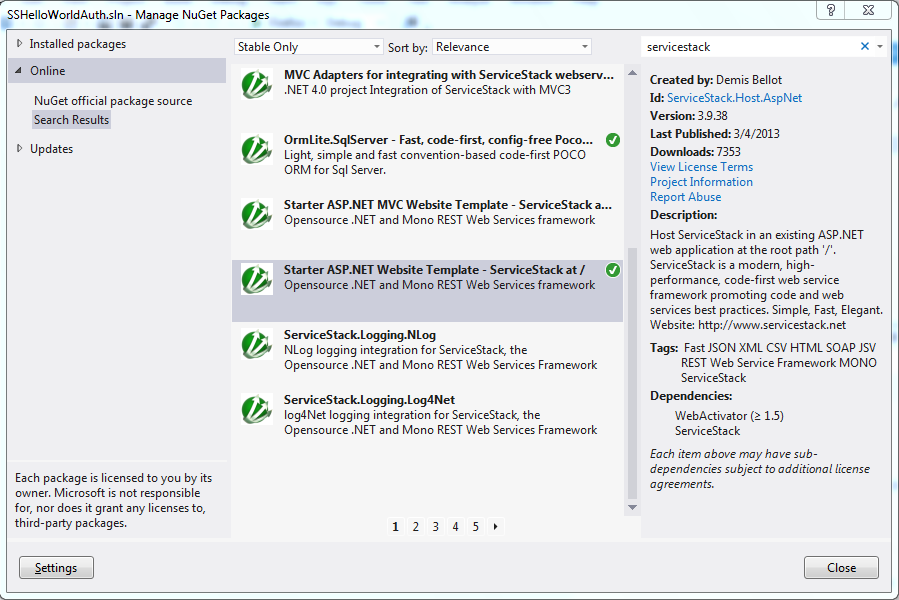
  • pull in ServiceStack assemblies via NuGet (not my usual practice, but its easy). In fact, i’m using the “Starter ASP.NET Website Template – ServiceStack”. That will install all the assemblies and create references, and also update Global.asa
  • Create the Hello , HelloRequest, HelloResponse, and HelloService classes, just like the sample. Scratch that – it is already defined in the template at App_Start/WebServiceExamples.cs
  • Run the app locally. You will see the “ToDo” app loaded and working in the default.htm. Also, you can test the Hello function at http://localhost:65227/hello (your port number may vary)


Adding a built-in authentication provider

OK that was the easy part. Now we’re going to add the [Authenticate] attribute to the HelloService class.

[Authenticate]
public class HelloService : Service
{  ...

This will prevent the service from executing unless the session is authenticated already. In this case, it will fail, since nothing is set up.

Enabling Authentication

Now looking in App_Start/AppHost.cs , i found an interesting section:

		/* Uncomment to enable ServiceStack Authentication and CustomUserSession
		private void ConfigureAuth(Funq.Container container)
		{
			var appSettings = new AppSettings();

			//Default route: /auth/{provider}
			Plugins.Add(new AuthFeature(this, () => new CustomUserSession(),
				new IAuthProvider[] {
					new CredentialsAuthProvider(appSettings), 
					new FacebookAuthProvider(appSettings), 
					new TwitterAuthProvider(appSettings), 
					new BasicAuthProvider(appSettings), 
				})); 

			//Default route: /register
			Plugins.Add(new RegistrationFeature()); 

			//Requires ConnectionString configured in Web.Config
			var connectionString = ConfigurationManager.ConnectionStrings["AppDb"].ConnectionString;
			container.Register<IDbConnectionFactory>(c =>
				new OrmLiteConnectionFactory(connectionString, SqlServerDialect.Provider));

			container.Register<IUserAuthRepository>(c =>
				new OrmLiteAuthRepository(c.Resolve<IDbConnectionFactory>()));

			var authRepo = (OrmLiteAuthRepository)container.Resolve<IUserAuthRepository>();
			authRepo.CreateMissingTables();
		}
		*/

Let’s use it. But i want to just enable CredentialsAuthProvider, since that is a forms-based username/password authentication, (the closest to what i want to do customized).

A few notes on the code block above:

The “Plugins.Add(new AuthFeature(() ” stuff was documented.

“Plugins.Add(new RegistrationFeature());” was new to me, but now i see it is to add the /register route and behavior
For this test, i will go along with using the OrmLite for the authentication tables. In order to do that,

  • i’m using a new connection string “SSHelloWorldAuth”,
  • adding it to Web.config: <connectionStrings><add name=”SSHelloWorldAuth” connectionString=”Data Source=.\SQLEXPRESS;Initial Catalog=SSHelloWorldAuth;Integrated Security=SSPI;” providerName=”System.Data.SqlClient” /></connectionStrings>
  • creating a new SQLEXPRESS database locally, called: SSHelloWorldAuth

Finally, we’ll have to add/enable the line to ConfigureAuth(container) , which will initialize the authentication system.

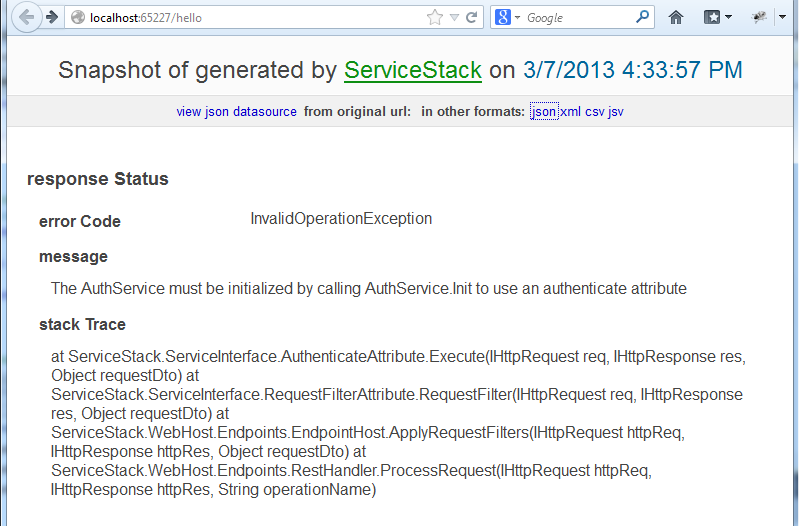
Now we’ll try running the app again: F5 and go to http://localhost:65227/hello in the browser again. I get a new problem:

In a way, it’s good, because the [Authenticate] attribute on the HelloService class worked – the resource was found, but sent a redirect to /login . However, no handler is set up for /login.

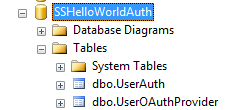
Separately, i checked if the OrmLite db got initialized with authRepo.CreateMissingTables(); , and it seems it did (2 tables created).

Understanding /login , /auth/{provider}

This is where i got hung up on my initial try to get it working, so i’m especially determined to get this working.

The only example of a /login implementation i found in the ServiceStack source code tests. It seems like /login would be for a user to enter in a form. It seems if you are a script (javascript or web api client), you would authenticate at the /auth/{provider} URI.

That’s when i thought – is the /auth/* service set up properly? Let’s try going to http://localhost:65227/auth/credentials

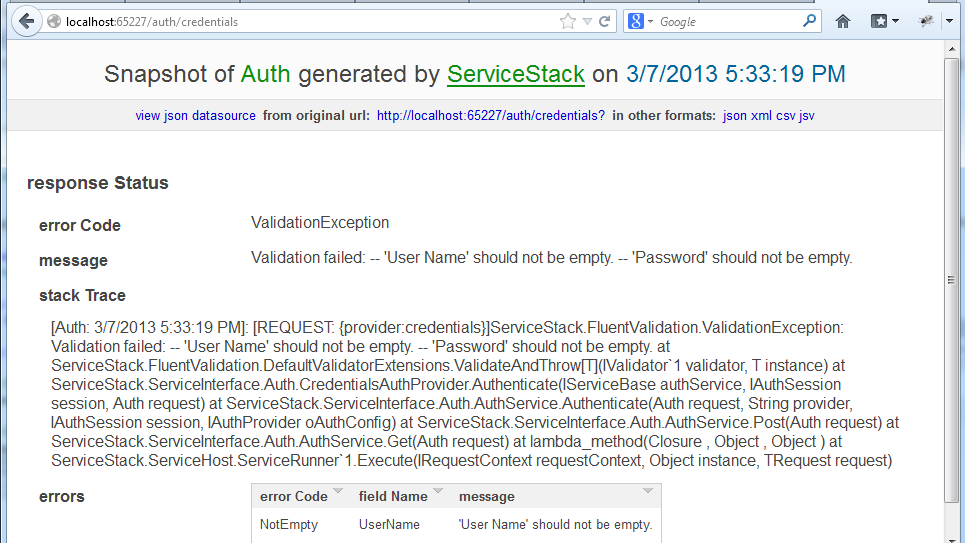
So the good news is that is is set up. Why don’t we try to authenticate against /auth/credentials ?

Well, first i should create a valid username/password combination. I can’t just insert into the db, since the password must be one-way hashed. So i’m going to use the provider itself to do that.

I copied a CreateUser() function in the ServiceStack unit tests, and will run in my app’s startup. I modified slightly to pass in the OrmLiteAuthRepository, and call it right after initializing the authRepo.

CreateUser(authRepo, 1, "testuser", null, "Test2#4%");

Run the app with F5 again, and then check the database: select * from userauth — we now have one row with username and hashed password. Suitable for testing. (don’t forget to disable CreateUser() now).

Authenticating with GET

I would never do this on my “real” application. At minimum, i would only expose a POST method. But instead of writing some javascript, i’m going to try the web browser to submit credentials and try to authenticate.

First, i’m going to try and use a wrong password:

http://localhost:65227/auth/credentials?UserName=testuser&Password=wrong

… i get the same “Invalid UserName or Password” error, which is good.

Now i’ll try the correct username/password (url-encoding left as an exercise for the reader):

http://localhost:65227/auth/credentials?UserName=testuser&Password=Test2%234%25

Success! This means my user id has a validated ServiceStack session on the server, and is associated with my web browser’s ss-id cookie.

I can now go to the /hello service on the same browser session, and it should work:

Awesome. So we’ve figured out the /auth/credentials before the /hello service. Just for kicks, i stopped running the app in Visual Studio and terminated my local IIS Express web server instance, in order to try a new session. When i ran the project again and went to /hello , it failed as expected (which we want). Only by authenticating first, do we access the resource.

IAuthProvider vs IUserAuthRepository

Note that i started this saying i wanted to implement my own IAuthProvider. However, ServiceStack also separately abstracts the IUserAuthRepository, which seems to be independently pluggable. Think of it this way:

  • IAuthProvider is the authentication service code backing the HTTP REST API for authentication
  • IUserAuthRepository is the provider’s .NET interface for accessing the underlying user/role data store (all operations)

Since my initial goal was to use username/password login with my own custom/legacy authentication rules, it seems more appropriate to use subclass CredentialsAuthProvider (creating my own AcmeCredentialsAuthProvider).

I do not expect to have to create my own IUserAuthRepository at this time– but it would be useful if i had to expose my custom datastore to be used by any IAuthProvider. If you are only supporting one provider, you can put the custom code into the provider’s TryAuthenticate() and OnAuthenticated() methods. With a legacy system, you probably already have tools to manage user accounts and roles, so you’re not likely to need to re-implement all the IUserAuthRepository methods. However, if you need to implement Roles, a custom implementation of IUserAuthRepository may be in order (to be revisited).

This is going to be almost directly from the Authentication and Authorization wiki docs.

  • Create a new class, AcmeCredentialsAuthProvider.cs
  • subclass CredentialsAuthProvider
  • override TryAuthenticate(), adding in your own custom code to authenticate username/password
  • override OnAuthenticated(), adding any additional data for the user to the session for use by the application
    public class AcmeCredentialsAuthProvider : CredentialsAuthProvider
    {
        public override bool TryAuthenticate(IServiceBase authService, string userName, string password)
        {
            //Add here your custom auth logic (database calls etc)
            //Return true if credentials are valid, otherwise false
            if (userName == "testuser" && password == "Test2#4%")
            {
                return true;
            }
            else
            {
                return false;
            }
        }

        public override void OnAuthenticated(IServiceBase authService, IAuthSession session, IOAuthTokens tokens, Dictionary<string, string> authInfo)
        {
            //Fill the IAuthSession with data which you want to retrieve in the app eg:
            session.FirstName = "some_firstname_from_db";
            //...

            //Important: You need to save the session!
            authService.SaveSession(session, SessionExpiry);
        }
    }

As you can see, i did it in a trivially stupid way, but any custom logic of your own will do.

Finally, we change AppHost.cs ConfigureAuth() to load our provider instead of the default.

			Plugins.Add(new AuthFeature(() => new CustomUserSession(),
				new IAuthProvider[] {
					new AcmeCredentialsAuthProvider(appSettings), 
				}));

Run the app again, you should get the same results as before passing the correct or invalid username/password. Except in this case, you can set a breakpoint and verify your AcmeCredentialsAuthProvider code is running.

So at the end of this i’m happy:

  • I established how to create a ServiceStack service with a working custom username/password authentication
  • I learned some things from the ServiceStack Nuget template which was in addition to the docs
  • I understand better where it is sufficient to only override CredentialsAuthProvider for IAuthProvider , and where it may be necessary to implement a custom IUserAuthRepository (probably to implement custom Roles and/or Permissions)

Thanks for your interest. If you are interested in the code/project file created with this post, i’ve pushed it to GitHub.


Continuous Deployment for ASP.NET using Git, MSBuild, MSDeploy, and TeamCity

Continuous Deployment goes a step further than Continuous Integration, but based on the same principle: the more painless the deployment process is, the more often you will do it, leading to faster development in smaller, manageable chunks.

As a C#/ASP.NET developer deploying to an IIS server, the go-to tool from Microsoft is MSDeploy (aka WebDeploy). This article primarily discusses steps in Visual Studio 2010, Web Deploy 2.0, and TeamCity 7.1. I have read numerous articles which explain using Git w/TeamCity and MSBuild, but not so much specifically with MSDeploy.

My ideal setup is to have the CI server automate all the steps which would otherwise be done manually by the developer. I am using the TeamCity 7 continuous integration server. You can mix/match your own tools, but the basic steps would be the same:

  • Edit your VS web project “Package/Publish” settings
  • New code changes are committed to source control branch (in my case, Git)
  • TeamCity build configuration triggers builds from VCS repository (Git) when new commits are pushed up
  • Build step: MSBuild builds code from .csproj, .sln or .msbuild xml file
  • Build step: Run unit tests  (xUnit.net or other)
  • Build step: MSBuild packages code to ZIP file
  • Build step: MSDeploy deploys ZIP package to remote server (development or production)

I’ll go thru the steps in detail (except test running, which is important, but a separate focus).

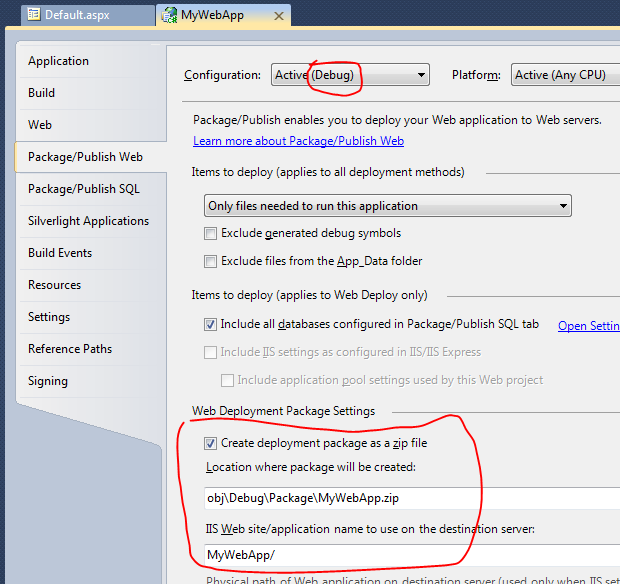
Step 1: edit the Visual Studio project properties

When deploying, there are some important settings in the project which affect deployment. To see them, in your solution explorer, right-click (project name) -> Properties… , tab “Package/Publish Web” …

  • Configuration: Active (Debug) – this means the ‘Debug’ config is active in VS, and you are editing it. The ‘Debug’ and ‘Release’ configurations both can be selected and independently edited.
  • Web Deployment Package Settings – check “Create deployment package as zip file”. We want the ZIP file so it can be deployed separately later.
  • IIS Web Site/application name – This must match the IIS Web site entry on the target server. Note i use “MyWebApp/” with no app name after the path. That is how it looks on the web server config.


Save it with your project, and make sure your changes are checked into Git (pushed to origin/master). Those settings will be pulled from version control when the CI server runs the build steps.

Step 2: add a Build Step in the TeamCity config

I edit the Build Steps, and add a second build step, to build the MyWebApp.sln directly, using msbuild.

MSBuild
Build file path: MyWebApp/MyWebApp.sln
Targets: Build
Command line parameters: /verbosity:diagnostic


Step 3: fix build error by installing Microsoft Visual Studio 2010 Shell (Integrated) Redistributable Package

My first build after adding the web project did fail. Here’s the error:

C:\TeamCity\buildAgent\work\be5c9bc707460fdf\MyWebApp\MyWebApp\MyWebApp.csproj(727, 3): error MSB4019: The imported project “C:\Program Files (x86)\MSBuild\Microsoft\VisualStudio\v10.0\WebApplications\Microsoft.WebApplication.targets” was not found. Confirm that the path in the <Import> declaration is correct, and that the file exists on disk.

I did a little research, and found this link:

http://stackoverflow.com/questions/3980909/microsoft-webapplication-targets-was-not-found-on-the-build-server-whats-your

Basically, either we need to install VS on the build server, manually copy files, or install the Microsoft Visual Studio 2010 Shell (Integrated) Redistributable Package. I’m going to try door #3.

Step 4: Install the Microsoft Visual Studio 2010 Shell (Integrated) Redistributable Package

After installing the Microsoft Visual Studio 2010 Shell (Integrated) Redistributable Package on the build server, i go back in TeamCity and click the [Run…] button, which will force a new build. I have to do this because nothing changed in the Git source repository (i only installed new stuff on the server), so that won’t trigger a build.

Luckily, that satisfied the Web App build– success!

Looking in the build log, i do see it built MyWebApp.sln and MyWebApp.dll.

So build is good. Still no deployment to a server yet.

Step 5: Install the MS Web Deployment tool

FYI, i’m following some hints from:

I get the Web Deployment Tool here and install. After reboot, the TeamCity login has a 404 error. Turns out Web Deploy has a service which listens on port 80, but so does TeamCity Tomcat server. For short term, i stop the Web Deploy web service in control panel, and start the TeamCity web service. The purpose of the Web Deployment Agent Service is to accept requests to that server from other servers. We don’t need that, because the TeamCity server will act as a client, and deploy out to other web servers.

The Web Deployment Tool also has to be installed on the target web server. I’m not going to go too far into detail here, but you have to configure the service to listen as well, so when you run the deployment command, it accepts it and installs on the server. For the development server, i set up a new account named ‘webdeploy’ with permission to install. For production web servers, i’m not enabling it yet, but i did install Web Deploy so i can do a manual run on the server using Remote Desktop (will explain later).

Step 6: Create a MSBuild command to package the Web project

http://www.troyhunt.com/2010/11/you-deploying-it-wrong-teamcity_24.html

In that post, the example “build-it-all” command is this:

msbuild Web.csproj
  /P:Configuration=Deploy-Dev
  /P:DeployOnBuild=True
  /P:DeployTarget=MSDeployPublish
  /P:MsDeployServiceUrl=https://AutoDeploy:8172/MsDeploy.axd
  /P:AllowUntrustedCertificate=True
  /P:MSDeployPublishMethod=WMSvc
  /P:CreatePackageOnPublish=True
  /P:UserName=AutoDeploy\Administrator
  /P:Password=Passw0rd

This is a package and deploy in one step. However, i opted for a different path – separate steps for packaging and deployment. This will allow cases for building a Release package but manually deploying it.

So in our case, we’ll need to do the following:

  • Try using the “Debug” config. That will use our dev server web.config settings. XML transformations in Web.Debug.config get applied to Web.config during the MSBuild packaging (just as if you ran ‘Publish’ in Visual Studio).

This is the msbuild package command:

"C:\Windows\Microsoft.NET\Framework\v4.0.30319\MSBuild.exe"
           MyWebApp/MyWebApp/MyWebApp.csproj
           /T:Package
           /P:Configuration=Debug;PackageLocation="C:\Build\MyWebApp.Debug.zip"

Let me explain the command parts:

  • MyWebApp.csproj : path to VS project file to build. There are important options in there which get set from the project Properties tabs.
  • /T:Package : create a ZIP package
  • /P:Configuration=Debug;PackageLocation=*** : run the Debug configuration. This is the same as Build in Visual Studio with the ‘Debug’ setting selected. The ‘Package Location’ is what it created. We will reference the package file later in the deployment command.

I tested this command running on my local PC first. When it was working, i ran the same on the CI server via Remote Desktop (for me, it’s a remote Windows 7 instance).

Step 7: Create a Web Deploy command to deploy the project

  • MsDeployServiceUrl – we’ll have to configure the development web server with Web Deploy service.
  • Set up user account to connect as (deployuser)
  • Have a complete working MSbuild.exe command which works on the command line
  • Put the MSBuild command into a new “Deploy” step in TeamCity

After a lot of testing, i got a good command, which is here:

"C:\Program Files\IIS\Microsoft Web Deploy V2\msdeploy.exe" -verb:sync
     -source:package="C:\Build\MyWebApp.Debug.zip"
     -dest:auto,wmsvc=devserver,username=deployuser,password=*******
     -allowUntrusted=true

This command is also worth explaining in detail:

  • -verb:sync : makes the web site sync from the source to the destination
  • -source:package=”C:\Build\MyWebApp.Debug.zip” : source is an MSBuild zip file package
  • -dest:auto,wmsvc=devserver : use the settings in the package file to deploy to the server. The user account is an OS-level account with permission (i tried IIS users, but didn’t get it working). The hostname is specified, but not the IIS web site name (which is previously specified in the MSBuild project file in the project properties).

After deployment, i checked the IIS web server files, to make sure they had the latest DLLs and web.config file.

Step 8: Package and Deploy from the TeamCity build steps

Since we now have 2 good commands, we have to add them to the build steps:

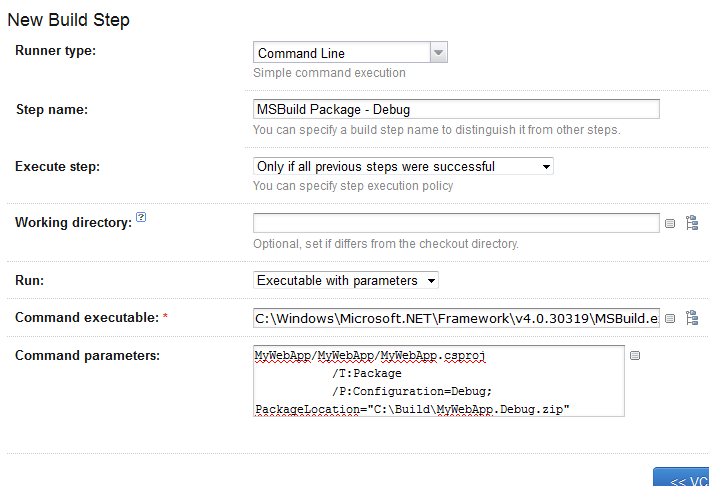
MSBuild – Package step


Note – there is a special TeamCity MSBuild option, but i went with the command-line runner, just because i already had it set.

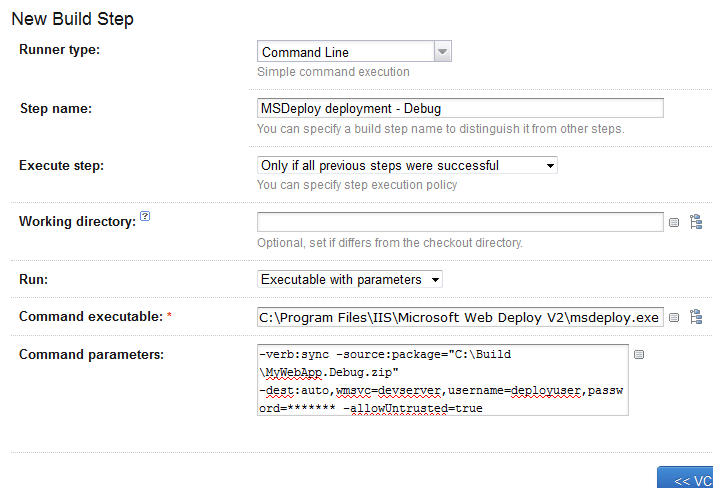
MSDeploy – Deploy step


In this case, i had to use the command-line runner, since there is no MSDeploy option.

When you run the build with these steps, if they succeed, we finally have automatic deployment directly from git!

You can review the logs in TeamCity interface after a build/deployment, to verify everything is as expected. If there are errors, those are also in the logs.

Now every time new code gets merged and pushed to git origin/master branch, it will automatically build and deploy the the development server. Another benefit is that the installed .NET assemblies will have version numbers which match the TeamCity build number, is you use the AssemblyInfo.cs patcher feature.

It will dramatically reduce the time needed to deploy to development – just check in your code, and it will build/deploy in a few minutes.


ASP.NET MVC Custom Model Binder – Safe Updates for Unspecified Fields

Model Binders are one of the ASP.NET MVC framework’s celebrated features.

The typical way web apps work with a form POST is that the forms key/value pairs are iterated through and processed. In MVC, this works in the Action method’s FormCollection.

        [HttpPost]
        public ActionResult Edit(int id, FormCollection collection)

You create your data object and have a line per field.

            dataObject.First_name = collection["first_name"].ToString();
            dataObject.Age = (int)collection["age"];

This gets a little tedious, especially when you have to check values for null or other invalid values.

MVC Model Binders do some “magic” to handle the details of mapping your HTTP POST to an object. You specify the typed parameter in the ActionResult method signature…

        [HttpPost]
        public ActionResult Edit(int id, MyCompany.POCO.MyModel model)

… and the framework handles the mapping to the object for you.

The good part: you just saved a lot of code, which is good for efficiency and for supporting/debugging.

The bad part: what happens when we edit/update an object and the form does not include all the fields? We just overwrote the value to the default .NET value and saved to the db.

For example, if the model record had a property called [phone_number], and this MVC form did not have it. Maybe the form had to hide some values from update, or else the data model changed and added a field. In an Edit/update, the steps would be:

  1. creates the object from the class,
  2. copy the values from the form
  3. save/update to the db

… we never actually grab the current values of [phone_number], and we just set it to the .NET default value for the string type. Lost some real data. Not good.

ActionResult method and Model Binder steps

What’s actually happening:

  • framework looks at the parameter type and executes the registered IModelBinder for it. If there is none, it uses DefaultModelBinder

DefaultModelBinder will do the following: (source here)

  • create a new instance of the model – default values , i.e. default(MyModel)
  • read the form POST collection from HttpRequestBase
  • copy all the matching fields from the Request collection to the model properties
  • run it thru the MVC Validator, if any
  • return it to the controller ActionResult method for further action

Writing code in the Action method to fix the problem

My first step to deal with the issue was to fall back to the FormCollection model binder and hand-code the fix. It looks something like this:

        [HttpPost]
        public ActionResult Edit(int id, MyCompany.POCO.MyModel model, FormCollection collection)
        {
            // update
            if (!ModelState.IsValid)
            {
                return View("Edit", model);
            }

            var poco = modelRepository.GetByID(id);

            // map form collection to POCO
            // * IMPORTANT - we only want to update entity properties which have been 
            // passed in on the Form POST. 
            // Otherwise, we could be setting fields = default when they have real data in db.
            foreach (string key in collection)
            {
                // key = "Id", "Name", etc.
                // use reflection to set the POCO property from the FormCollection
                System.Reflection.PropertyInfo propertyInfo = poco.GetType().GetProperty(key);
                if (propertyInfo != null)
                {
                    // poco has the form field as a property
                    // convert from string to actual type
                    propertyInfo.SetValue(poco, Convert.ChangeType(collection[key], propertyInfo.PropertyType), null);
                    // InvalidCastException if failed.
                }

            }

            modelRepository.Save(poco);

            return RedirectToAction("Index");
        }

In this example, modelRepository could be using NHibernate, EF, or stored procs under the hood, but it could be any data source. We loop thru each form post key and try to find a matching property on the model (using reflection). If it matches, convert the string value from the form collection and set it as the value for that propery (also using reflection).

This works and is good, until you realize you have to insert it into every Action method. We could also go traditional, and just stick it in a function call. But we want to leverage the MVC convention-over-configuration philosophy. So now we’re going to try wrapping it in a custom model binder class.

Creating a Custom Model Binder to fix the problem

To avoid the “unspecified field” problem, we want a model binder to actually do the following on Edit:

  • Get() the model from the repository by id to create a new instance of the model
  • Update the fields of the persisted model which match from the FormCollection
  • run it thru the MVC Validator, if any
  • return it to the controller ActionResult method for further action (like Save() )

I am going to define a generic class which is good for any of my POCO types, and inherit from DefaultModelBinder:

    public class PocoModelBinder<TPoco> : DefaultModelBinder
    {
        MyCompany.Repository.IPocoRepository<TPoco> ModelRepository;

        public PocoModelBinder(MyCompany.Repository.IPocoRepository<TPoco> modelRepository)
        {
            this.ModelRepository = modelRepository;
        }

Note, i also inject my Repository (i use IoC), so that i can retrieve the object before update.

DefaultModelBinder has the methods CreateModel() and BindModel(), and we’re going to go with that.

        public object CreateModel(ControllerContext controllerContext, ModelBindingContext bindingContext)
        {
            // http://stackoverflow.com/questions/752/get-a-new-object-instance-from-a-type-in-c
            TPoco poco = (TPoco)typeof(TPoco).GetConstructor(new Type[] { }).Invoke(new object[] { });

            // this is from the Route url: ~/{controller}/{action}/{id}
            if (controllerContext.RouteData.Values["action"].ToString() == "Edit")
            {
                // for Edit(), get from Repository/database
                string id = controllerContext.RouteData.Values["id"].ToString();
                poco = this.ModelRepository.GetByID(Int32.Parse(id));
            }
            else
            {
                // call default CreateModel() -- for the Create method
                poco = (TPoco)base.CreateModel(controllerContext, bindingContext, poco.GetType());
            }

            return poco;
        }

As you can see, with CreateModel(), if it is an Edit call, we retrieve the model object by the id specified in the URL. This is already parsed out in the RouteData collection. If it is not an Edit, we just call the base class CreateModel(). For example, a Create() call may also use the same ModelBinder.

Now, in the BindModel() method, this is where we move our logic to iterate thru the Form key/value pairs and update the POCO. But in this version, we only update fields in the form, and leave other properties alone:

        public override object BindModel(ControllerContext controllerContext, ModelBindingContext bindingContext)
        {
            object model = this.CreateModel(controllerContext, bindingContext);

            // map form collection to POCO
            // * IMPORTANT - we only want to update entity properties which have been 
            // passed in on the Form POST. 
            // Otherwise, we could be setting fields = default when they have real data in db.
            foreach (string key in controllerContext.HttpContext.Request.Form.Keys )
            {
                // key = "Pub_id", "Name", etc.
                // use reflection to set the POCO property from the FormCollection
                // http://stackoverflow.com/questions/531025/dynamically-getting-setting-a-property-of-an-object-in-c-2005
                // poco.GetType().GetProperty(key).SetValue(poco, collection[key], null);

                System.Reflection.PropertyInfo propertyInfo = model.GetType().GetProperty(key);
                if (propertyInfo != null)
                {
                    // poco has the form field as a property
                    // convert from string to actual type
                    // http://stackoverflow.com/questions/1089123/c-setting-a-property-by-reflection-with-a-string-value

                    propertyInfo.SetValue(model, Convert.ChangeType(controllerContext.HttpContext.Request.Form[key], propertyInfo.PropertyType), null);

                    // InvalidCastException if failed.

                }

            }

            return model;
        }

Great. Now that we have our ModelBinder, we have to tell our MvcApplication to use it. We add it the following line to Application_Start():

            // Custom Model Binders
            System.Web.Mvc.ModelBinders.Binders.Add(
                typeof(MyCompany.POCO.MyModel)
                , new MyMvcApplication.ModelBinders.PocoModelBinder<MyCompany.POCO.MyModel>(
                    WindsorContainer.Resolve<MyCompany.BLL.Repository.IPocoRepository<MyCompany.POCO.MyModel>>()
                    )
                );

In english, we are saying: Add to the ModelBinder collection… when you have to Model Bind a MyCompany.POCO.MyModel, use the PocoModelBinder<> (and pass it an IPocoRepository so it can access the data store).

Now we’re able to run our app, and can do safe, smart updates the “MVC-way”, keeping our methods clean.

I’ve use the Castle Windor IoC container and any NHibernate-backed Repository in this case, but the same technique can be used in any ASP.NET MVC app using any data access backend, and with or without any IoC container.

For more on Model Binders, see Mehdi Golchin’s Dive Deep Into MVC – IModelBinder Part 1.